Pages

Monday, December 24, 2012

Homemade Coconut Balls (faux Mounds)

    I have become the kind of cook/baker I used to hate. I remember after I got married asking my mother in law and grandmother how they make a certain recipe. They both would tell me ... oh just a pinch of this or a handfull of that. I hated trying to figure this out. sometimes it worked, sometimes not. Now I do the same thing. I have been doing some Christmas baking the past coule of days. last night I made peanut butter balls . These taste almost like peanut butter cups. Then hubby asked for his usual coconut balls last night. So this morning I have been working on these this morning.
                                                    COCONUT BALLS

14 oz bag of flaked coconut
1 stick of cold butter or margarine
1 Tablespoon plus 1 tsp vanilla
32 oz bag of powdered sugar

combine about 2/3 of a bag of powdered sugar and remaining ingredients. Using your hands combine ingredients. At first it will feel like there is no way its going to come together, but the heat of your hands softens the butter a little. It should have sort of a play doh consistency. You may need to add the remaining powdered sugar.

Start melting your chocolate chips and wax for the chocolate coating in a double boiler, or just use two small pans. Recipe for coating is below.
Now roll your filling into 1" balls. I got about 52 from the above recipe.

CHOCOLATE COATING
approx 2/3 bag of semi sweet chocolate chips
shave some parafin baking wax ( this part I dont understand, but I was taught to use this many yrs ago, and have even seen it used online. I notice it does make the chocolate a little thinner, and thereby making the balls easier to coat.)

Place ingredients into a double boiler over low heat. Once melted, roll your balls into the chocolate with a fork, and lay out onto wax paper. I had to lay mine on plastic wrap as I was out of wax paper You may need to refridgerate  for a little while before placing them into container. 

TIP: You could also roll up an almond inside for  Almond Joys with nuts.


Thanks for visiting. I am joining:
StoneGable Tutorials, Tips, and Tidbits

Saturday, December 22, 2012

Little Crochet Acorns

My daughter showed me a pic of some crochet acorn's that she found on the computer tonight. She fell in love with them, and wanted some. She asked if I could make them. well a couple hours later while watching a Christmas show on TV, this is what i came up with:
They work up very quickly and easily. here is basically how i did them.
1. Ch 2, 4 sc in first ch , join to first sc and ch 1
2. Sc in same joining space, and sc in same space again. Continue with 2 sc in each sc of row below.Join,
    ch 1
3. Sc in same joining space, and sc in same space again. 2 sc in each sc of row below. Join, and ch 1
4. Sc  in each sc in row below. Join, ch 1 . Repeat this row 6 more times. Tie off.
5. Now for the cap. Ch 17, and join. Make sure this loop will fit around the top of your acorn. if it doesnt 
     easily, separate and add or subtract a chain. Ch 1
6. Sc in each ch, join, and ch 1. repeat this row once more.
7. Skip next sc and sc in next one. Skip one sc, and sc in the next. Continue around , not joining, just 
     working in a spiral.
8.Continue  step 7 until you reach the very tip, and creat a little nub at the top, cut, and pull end thru loop.
9. Put a little bit of glue around the inside edge of cap. Stuff acorn, and push cap on and let dry.

Wouldnt these look adorable strung on twine to form garland and hung on the tree, or mantle? Or how about filling a little basket or bowl?Or even in a small nest and placed on the tree?


Wednesday, December 19, 2012

How To Make a Badge For Your Blog

       If you visit many blogs, you will notice a LOT are adding badges to represent their blog with special code listed below it. This ever popular and growing trend is to allow the reader to copy the code and paste it into their own blog. This allows their readers to click on this badge and visit that block. Gradually increasing your reader base.
      The popular "Linky Parties" are a good place for these. Host a party and virtual party goers can share your badge . I am still learning about this side of blogging, and considering hosting my own someday soon.
      While considering these parties, I was trying to figure out how to get this badge with its grab code to show up on my blog. I tried several different HTML codes from several different sites, and nothing worked.That is until I stumbled upon "My Cool Realm". This site should be considered "Badges For Dummies" It couldnt have been made any easier. Just follow the steps listed to add in your blog address, url for our badge, and your website title. It worked... just look at mine on my sidebar. Here are the steps to make yours:

1. Design your badge. Most sites recommend a badge no bigger than 125 pixels x 125 pixels to easily fit others sidebar. Some say no more than 200 pixels. I found 200 a little large for my sidebar. But 125 seemed way to small for my old eyes to read, so mine is 150 pixels square.

2. Once this badge is designed, you will need some place to store it. I have read of a few different places, but photobucket seemed to be the most popular and easiest. So upload your badge.

3. Now while on photobucket, when it is uploaded you will see the pic show up below the upload box. Click on this to go to the image. On this page you will see a box to the right that looks like this:

see the box below the black box on the right? There is some URL's and HTML listed in the boxes. Click in the second box that is labeled " direct link". This will automatically copy the address for  your badge. 

4.Now go to mycoolrealm, and fill in the blanks. This address you just copied gets pasted into the box labeled: "Your Image URL". 

5. There are soem settings listed for colors and code box options below . I didnt mess with these, just left the default values, and my badge showed up just like I wanted, but feel free to experiment. You can easily re-do it if its not the way you want.

6. Now click "preview". This brings a pop-up box with your badge and a box that says something like "grab code" or similar. Click This.

7. Now this box disappears and at the bottom of the original page is a box with all your precious HTML coding to make your very own Grab Button.  Just click on "select" below this and it highlights your code. Now right click over this, and left click "copy", now we go to your blog.

8. I use blogger, so I am not real familiar with how the other blogs work. On blogger, go to "design" at the top of your blog. then to "layout". Now "add a widget" in your desired spot. Most use the sidebar. I have seen a few at the bottom.

9. Click on the tab to add HTML, and paste your code in here. be sure and click "SAVE", and your  done.

Check out your handiwork, and celebrate. A little cheering, a little dancing. Be careful....dont hurt yourself  :)


Tuesday, December 18, 2012

Sew Easy Method for Lining a Tote....Perfectly

        Ever make a beautiful tote bag to have it ruined by a lining that was not a perfect fit? You try to tops stitch the opening, just to have one side or the other bunch up because they dont match. You try and try, but your seam allowances just arent perfectly the same on both the tote and the lining.
        Sounds like I have some first hand experience huh. Who me? Never..........well, more times than I care to admit.
        Today, while trying to put together a quick tote for my granddaughter, I decided to try a shortcut. I have never done this before, nor seen it anywhere else, but believe me....I will be doing it again.  I didnt take pics along the way, simply cause I figured I would be ripping it out. But I did create a quickie tutorial using paint. If you have any questions, dont hesitate to leave a comment below.
When you decide on your bag dimensions, then add a little extra for thickness of your depth of bag. For example if you want to hold a book that is 1" thick, then we need to make sure the bag will have a 1" bottom, and still be the dimensions you wanted. So if you wanted your bag 10" wide, then add 1/2" to each sides width (A)
To figure the height of bag (1/2 of B), if you make the bottom 1" deep, then add this amount to B.
You can click on these pics to enlarge   
1. As indicated above, lay fabrics together with right sides facing together. stitch along edge A, leaving approximately 3" space for turning as indicated by red arrow. On the right edge, stitch clear down.
2. Now roll tube around, so seam lines are lined up against each other down the middle. Its best to have one seam facing one way and the other going in the opposite direction to kinda lock the seam lines together perfectly. Wrong sides are still facing out.

Now stitch the long edges as indicated by dotted lines.

3. Turn right sides out thru opening, and then slip lining INTO tote. Push corners down firmly into each other, turn back so lining is on the outside. Flatten corner so seam line goes down the middle
With corner flattened out so seam line runs right down the MIDDLE as indicated by black dotted line, figure out how thick you want your bag to be, depth of bag.

If you decide on thickness of bottom being 1", then lay ruler across red line, and slide down until red line measures 1". The distance down A and B should be equal. draw a line and stitch on this line (red line), These flaps will just fold over on the inside. Now turn back so outside of tote is back on the outside and lining on the inside. 

Add straps, and closures as desired.
TIP: you could sew the handles inside, between the layers when you do step 1.


Monday, December 17, 2012

German (Russian) Lace Tutorial Series 4

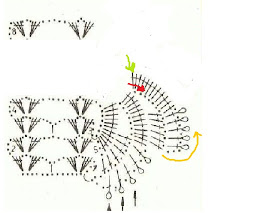
    Now we will get ready to start the repeats. From here on out, you will repeat the following steps to make your lace your desired length.
This is were you currently are:

You previously completed up to row 8 shown top left of above. The cluster section.
Now, following chart, work the first 4 rows of the cluster section again. Indicated inside the red brackets.
when you end the 4th row of repeat, ch 7, and ss into the top of the first dc of row 2 as indicated by blue arrow. You are working in direction of red arrow.
Now ch 3, and 12 dc back in ch 7 space.
ch 7 and dc in 7th dc from hook of previous row. Working again in direction of red arrow. Working on the section the red arrow is pointing to, ch 1, dc in next dc below, ch 1, and dc in next dc below. repeat until you have completed 6 dc.
ch 2, ss into top of dc of cluster from row 8 indicated by yellow arrow.Ch 2, dc into first ch 1 space of row before, working back up towards red arrow.


Now the chart indicates a picot here. See the circle at the tip of the first arrow at the bottom? But we wont do a picot now, since we ar going to join where this picot SHOULD be to where it is on the previous row.
see the 3 black arrows on the first chart above? These are where things are joined. Now follow these steps:

ss into first picot from row below, ch 1, dc into next ch 1 space, ss into second picot of row below, ch 1, dc into next ch 1 space of row below, ss into third picot, ch 1, dc into next ch 1 space of row below, now form a picot by chaining 3, ss back into tip of dc just completed, and ch 1, dc into next ch 1 space of row below, form a picot, and ch 1.

Now do 12 dc into ch 7 space directly to the right of the red arrow above , moving in the opposite direction of this red arrow.


beginning at red arrow, moving in direction of red arrow. Ch 7, dc in 7th dc from hook in row below.
Ch1, dc in next dc below, ch 1, dc, ch 1, dc, repeat till you have made 6 dc, ch 3 and turn to start back in direction of yellow arrow.
dc in first ch 1 space of row below, make a picot, dc in next ch 1 space, picot,ch 1, repeat until you have formed 5 picot, then ch 1, and make 12 dc into ch 7 space. End at green arrow at top of chart.

Now beginning at red arrow, ch 7, and dc in 7th dc from hook of row below. ch 1, dc in nect dc, and repeat until you have completed 6 dc. Ch 3 and work along yellow arrow in that direction. dc in first ch 1 space of row below, picot, ch 1, dc in next ch 1 space, picot, ch 1 and repeat until you have completed 5 dc with picots at the tip, 12 dc into ch 7 space, at begiining of green arrow, working in its direction now, ch 7 and dc in 7th dc from hook of row below, ch 1, dc,and repeat until you have completed 6 dc, and end at tip of green arrow.
Beginning at the end of the red arrow, ch 3 and crochet in direction of arrow. Dc in first ch 1 space of row below, make a picot, ch 1, repeat in next ch 1 space until you have completed 5 dc with picots at the tip, ch 1, then 12 dc into ch 7  space below. Ending at pointer of yellow arrow.

Now if you want to do it like the chart, skip the next blue step then go on. 3 dc into space indicated by green arrow.Ch 1.

Complete this step to do it like I did: 3 dc into space indicated by pointer of pink arrow. ch 1

Beginning at the red arrow, 3 dc into ch 3 space between clusters below at yellow arrow. ch 3, 3 dc in same space. working in direction of green arrow, ch 3, sc in 3rd ch below, ch 3, 3 dc into ch 3 space between clusters, ch 3, 3 dc. This completes row 5 of repeat as indicated on chart
Ch 4 and start row 6.
Beginning at red arrow, 3 dc in between clusters below, ch 3, 3 dc in same space. ch 5, 3 dc in next cluster space, ch 3, 3 dc into same space, ending at yellow arrow. Ch 1 and ss into 7th dc of 12 dc group as indicated by yellow arrow.,ch 2. 3 dc into space of cluster group, ch 3, sc into 3rd ch, ch 3 and 3 dc in between next cluster group. Ch 3, 3dc into same space. You have now completed row 7 of repeat.
ch 4, 3 dc in center of next cluster group, Ch 3, 3 dc in same space. Ch 5, 3 dc in next cluster group, ch 3, 3 dc in same space. You have now completed row 8 and we are FINALLY at the end of your first repeat.


To increase length of lace simply repeat this series. Congratulations, you now have a beautiful piece of lace. If your not happy, just pull it out and start over. Practice makes perfect. Its just string. Relax and enjoy the process. If you hve any questions about the pattern, comments, or requests, just leave me a comment below.


Sunday, December 16, 2012

Motorcycle Ride In December? Your Kidding, Right?

       I was on the floor in sweats wrapping Christmas presents, when hubby came in the door, and said he was taking the Goldwing to town ( 1/2 hr away) to get some drill bits. Without even thinking, "well sure" came out of my mouth. I never pass up a ride. Admittedly it was 60 degrees out. we have gone when it was colder.

Good Lord! Where are the hot flashes when I need them? Noooooo.......I have to get them in the middle of the night.

Friday, December 14, 2012

German Lace Tutorial Series 3

      Well, its getting late, but I thought I would try and add a few more steps in. So here we go:
Now we are going to work our way back in the direction of the red arrow, beginning at the blue arrow.
Ch 3, dc in the first ch 1 space below. make a picot at the tip as you have done before. ch 1, dc in the next ch 1 space, and picot again. Ch 1, and repeat until you have completed 5 dc with picot's at the tip. End with ch 1. Do 12 dc into the next ch 7 space below, and ending at the tip of the red arrow.
Your piece should look like this.
Now ch 7 and turn. You will be working in the direction of the red arrow, beginning at the blue arrow.
dc in the 7th dc from the hook in the row below. ch 1, dc in the next dc, continue until you have 6 dc made, and with the dc. You will now be at the tip of the red arrow.
Now you will start at the blue arrow and work in the direction of the red arrow. Ch 3, and dc into first ch 1 space below. make a picot at the top, ch 1, then dc in next ch 1 space,picot and ch 1. Continue until you have 5 dc with picots, end with ch 1.

Complete 12 dc in ch 7 space below, and end at the tip of the red arrow.
Your piece now looks like the one above. 


THERE WILL BE AN OPTIONAL STEP HERE
Work the following part in black print, or skip this section and go immediately to the red print
According to the  chart above you will start at the blue arrow and work in the direction of the red arrow. 
Dc into the end of the 12 dc group as indicated by the green arrow. You may need to slide the group back a tad to make room. Then ch 2 and 3 dc back into ch 3 space between cluster group of row 4, ch 3, and 3 more dc in smae space to form another cluster group for row 5.
Your piece will look like this:

Note, I did not care for the way this last step layed. So I made a slight change. You can do it either way, But since we are also learning to read charts, I wanted to show you the way the chart indicated too. 

above in the chart method, you started with the 3 dc into the end of the 12 dc group as indicated by the red arrow in the green piece above. Instead, make this 3 dc group in the space indicated by the red arrow. No ch 2, and do 3 dc into ch 3 space between cluster group of row 4. Ch 3, and do 3 more dc in same space. Ch 3, sc into 3rd  ch of  row below. Ch 3 and do 3 dc into ch 3 space between cluster group of row 4 below. 3 more dc into same space. You have just completed row 5. 
I think this change makes it lay a little flatter, and a little nicer.


Now we will continue to follow the chart. Start at blue arrow, ch 4 and turn. Work in direction of red arrow. 3 dc into ch 3 space of cluster group below. Ch 3, 3 dc in same space. Ch 5 and 3 dc in ch 3 space of cluster group. Ch 3, 3 dc in same space. End at tip of red arrow.
According to chart above, ch 1 and ss into 7th dc of 12 dc group to right as indicated by red arrow. Ch 2, working in direction of blue arrow, 3 dc into ch3 space of cluster group. Ch 3, 3 dc back into same space. h 3, sc into 3rd chain below. Ch 3, 3 dc into ch 3 space of cluster group, ch 3, 3 dc back into same space. You have just completed row 7. 


This shows two repeats done. Tomorrow I will get a pic of just the first repeat in the blue. Congratulations, you are doing very well. You have gotten this far on a pretty complicated pattern. hang in there for the next series and you will learn how to join the first row of the next repeat to your last (8th) row.Then you will be able to start your next repeat, and make this baby as long as you need.

PS, The link for each series will be listed under the "Tutorials" tab above so you can easily go back and forth between them as you need.

German Lace Tutorial Series 2

   Well, I hope you werent too intimidated by series 1. Just keep at it, and reading the steps. It will click and you will have some beautiful lace to work with. Now for the next steps.
Beginning at the red arrow from previous steps, ch 3, and turn work to move in direction of blue arrow.
Now dc into first ch 1 space of row below. The circle at the tip of the dc symbol indicates you will make a picot at the tip of 5 dc. It is done as follows: ch 3, slip stitch (ss) back into top of last dc just completed.

Now dc into next ch 1 space, and make another picot. Contine until you have 5 dc with picot's as indicated by chart. Ch 1, and complete 12 dc into ch 7 space below. You will end at tip of blue arrow.
Your piece should look like the above pic. Click on it for a close-up view.
Now ch 7 beginning at blue arrow. Move in direction of red arrow, and dc into 7th dc of 12 dc group in row below. Dc into next dc, ch 1, dc in next dc, ch 1, and continue until you have completed 6 dc. End with 6th dc at tip of red arrow.

Now beginning at blue arrow in chart above, and moving in direction of red arrow, you will ch 3,and turn
Now you see the same pattern of 5 dc with picots at the tip again.
Dc in next ch 1 space below, ch 3, ss back into tip of previous dc completed, and ch 1, dc into next ch 1 space, picot, and repeat until you have 5 dc with picots. Ch 1, and 12 dc into ch 7 loop below, and end at tip of red arrow. Another segment completed.
Sorry for the blurred pic. I must have moved when I snapped. But your piece should look like this now. If not....its just thread....pull it out and practice again. Remember......Practice makes Perfect!
Beginning at blue arrow and working in direction of red arrow, ch 7, and dc into 7th dc from hook of previous row, ch 1, dc in next dc, and repeat until you have completed 6 dc with a ch 1 between. ending at tip of red arrow.
Your piece will now look like this.