Pages

Friday, December 27, 2013

Handmade Country Apple Kitchen Towel

       Right after Christmas, I got in the mood to do some hand stitching. I didnt want to use my embroidery machine. I kind of wanted a country, or vintage look to my new towel. I bought a piece of fabric from a store in Berlin, Ohio. I believe this is the largest Amish area in the nation. This fabric had a nice stiff weight, so I hope it wont bunch up in the wash as my Joann fabric does.
      I cut out 3 apples from some country looking fabric, and turned the edge under and placed them in the center of the towel. Then I slipped the stem pieces under the apples, and the leaves in place. Then I hand stitched the pieces in place. For the apples and leaves I decided to do a blanket stitch with 3 strands of embroidery floss. I then sewed on the border fabric. I cut it  5 inches wide by the length of the towel. I stitched the back side of this border on the towel, then folded it to the front, turned the other edge under and top stitched in down from the front side.
     For the embroidered trim between these two pieces, I used the tutorial found HERE. For the crochet border I used the tutorial HERE. Here is the results:


Tuesday, December 24, 2013

Learning A New Craft

        For the about the past month, I have been researching a new interest. I plan on trying out Crazy Quilting for the first time.  friend peaked my interest in it. I had thought about it before, but just didnt think I would have the patience to do all the stitching that would be required in doing a quilt. I had a  "duh" moment when she mentioned just doing a pillow. I dont know why I never thought of that before, but i got excited over the prospect. Here is her webpage.
   During my time researching crazy quilting, I seen several pinned samples of blocks done with tatted pieces. Tatting is another thing I once thought of trying many years ago, but never got around to buying a shuttle. To be honest , it seemed a little difficult when I seen pictures of someone working with a shuttle. Then I came upon a youtube video HERE. I couldnt understand a thing she was saying. Well maybe a word here and there. But her video was excellent to follow. What I noticed was that you could also tat with a needle. I didnt need to learn to use a shuttle! She  made the needle tatting look very easy. Plus I love the delicate look of the lace. She is making earrings, but I thought these pieces would look very nice on my crazy quilt block.
     Then , I found this series of videos HERE. I liked her finger positioning technique. She was able to move very quickly. So with her  video's and the other's I watched, I managed to start a piece. This is only a segment of the earring piece, but it is coming along nicely. Especially considering this is my very first attempt at tatting.

Monday, December 23, 2013

What I Have Been Working On

    For the past month I have been putting together 4 diaper bag sets for my grand daughters. They include a diaper bag, plastic case with baby wipes, bib, diapers in 2 sizes, and a burping towel. Plus a magic sippy and bottle. I cant wait for them t open them. My girls just love their babies.

I made up the diaper bag pattern myself. The diaper and bib pattern came from here: http://beeinmybonnetco.blogspot.com/2012/01/new-outfit-for-dolly.html
I believe I played with the percent of full size settings in my printer to get just the right size to fit my granddaughters dolls.
For the wipes I simply cut a 6" square piece of flannel, and turned the edges over once and did a decorative stitch. However, later I seen to use the plastic travel soap dishes as a wipes case. These would be best done about and inch smaller to fit the boxes easier. I also cut a peanut shape out of 2 pieces of flannel and with right sides facing stitched the edges together. Be sure and leave a small opening on a striaght of way for turning. Clip the curves, turn, and press. Then top stitch clear around.
I think a small doll size sling would also be adorable. Here is a great tutorial I will be using if I get time to make them: http://www.pinterest.com/offsite/?token=486-205&url=http%3A%2F%2Fwww.oursevendwarfs.com%2F2011%2F07%2Fbaby-sling-tutorial.html&pin=131519251591473810

Wednesday, October 16, 2013

What Happened To My Sweet Little Kitty?

Last year my son rescued a sweet little kitty from some animal that was feeding on the litter a little at a time. The litter was where he worked. This little thing was so grateful he would love to climb on my shoulder and cuddle. he was so sweet. What happened to this gentle, loving kitty?
Remember this post: Porch Paint Job
And remember the culprit:
Yep! This is the same guy, only much bigger. Except now he is cocky, hyper, a terrorizer of the other animals, and sometimes a little psycho!
There is times he will run thru the house in hyper-mode like something out of the movie Matrix. Running full speed, sideways across the back of the couch, from one object to the next then out the doggy door. he has sat to the side of the doggy door out of site of the innocent family member coming thru the door. Then when they get thru , he pounces on them, rolling with them across the floor.I have made a mad dash to the bathroom (you antique women know how that it), sit down on the toilet in a hurried rush, to realize the seat is wet. Then when I get up I see muddy footprints on the seat and down inside. We now have to keep the seat down because he likes to play.
       For over 30 yrs we have kept cats. Since then, we no longer had a problem with mice in the house. UNTIL NOW! About a month ago, I was getting something out of a little cabinet. I kept smelling something.  So I pulled out the cabinet,and found a dead mouse to the right corner. Yea, I knew who did it. he probably brought it in to play, and hid it for later. So I swept him up in my dustpan, tossed it out, then mopped the floor. Then I noticed a piece of paper that had fell behind on the left corner. I picked it up, and there was another one under it. Except this one was so far gone, tufts of hair was around it, and coming  loose when I swept him up. I mopped again. 
        Now fast forward to yesterday afternoon, I am walking into the kitchen to start supper, and sitting in the middle of the floor is another small mouse. Now i hate mice and bugs, and if this critter had taken off running, I would have run screaming in the other direction. Probably looking for the nearest chair. But I grabbed a broom, and tried to hold him in place with the bristles. he was very slow moving, and seemed very weak. I guess another of Joey's playmates. He is hard on friends. Just as I had him trapped my husband came in and I quickly relinquished the handle. He held it, then I got the dust pan and he was able to scoop him in and throw him out. Then later that evening, another weak, and barely moving mouse was found in the bathroom floor. My son got him out.
                 What ever happened to cats keeping the mice OUT?!
                              Not bringing them in to play!

Tuesday, October 08, 2013

Western Style Handmade Homespun Kitchen Towel Tutorial

        I just finished this towel this morning, and I think it turned out pretty well. There are a few changes in measurements I have decided to make after seeing it. It went together really easy and quick. Use your own embroidery designs, or just stitch on a band of contrasting fabric instead. These would make great Christmas gifts as well. To purchase the machine embroidery design I used for this towel, then go to:
http://stitchthisdesigns.blogspot.com/2013/10/lost-horse-western-design.html


Go here to download towel topper pattern for free. Be sure your printed dimensions are approx 7 and 1/4" tall  x 5 and /8" wide at the widest point at the bottom.
DOWNLOAD TOPPER

Here is the tutorial for the towel.
1. cut desired fabric for the body of the towel 13" long, and 21" wide
2.Cut out 2 pieces for the towel topper. be sure and add in seam allowances to patern piece all the way around. Iron on stabilizer to one piece. This piece will be your TOP piece.. Cut a piece of velcro about 1" long and stitch onto top of topper, and on bottom about 1" up from folded edge of topper. Stitch these onto the TOP piece of topper only. be sure to center them.

3. Place topper pieces with right sides together. Stitch around, leaving bottom open. Clip curves, and turn right sides out. Press well.
4 Turn up edges on bottom towards inside and press well.

5. Cut decorative band 3" wide by 21" long. Stitch embroidery design in center, and fold over long edges approx 1/4" and press.
6. Place band on towel 3" up from bottom on towel, and stitch long edges down. press well again. Trim edges of band that meat sides of towel to same width of towel if needed.

7. With a narrow 1/4" hem, hem sides of towel (13" sides), and lower edge of towel. Leave top edge un-hemmed.
8. find center of towel and mark it at the top edge. Then measure over 3/4" from center, and then 3/4" over from that mark. Then do the same on the other side of center.

9. With back of towel facing you, Pinch up fabric at second mark and fold over to meet center. Fold should line up on 1st mark from center. Do the same with the opposite side. Pin well. ( pen in pic indicates center mark)


(these folds are shown from the TOP or RIGHT side of towel)


10. Now fold sides of towel over to back to meet in center. Form a pleat in each side as needed to make towel width same width as your topper. Pin in place.
11. Now slip upper edge of towel into bottom of topper. Pin and stitch all the way around edges  of topper.
(the above pic shows pleat from the back side)

Notice velcro side of topper is on the right side of towel, same side as decorative band.

Enjoy!


Wednesday, October 02, 2013

GMO seed and a Trip To Amish Country

     Last year my husband and I took our very first trip to an Amish area. We went to Berlin, Ohio, and visited Sugar Creek,and other local areas. we stayed in our camper and traveled everywhere on our Honda Gold Wing. We loved the trip. It was time to relax, enjoy the scenery, and each other. We enjoyed the buggies, watching the Amish kids playing in the school yard.  Laundry hanging in the sunshine , their shades of blue waving in the breeze. We visited the local eating places, toured the shops admiring their handwork.
     We just got back from our second trip to the same area on Sunday. It was another wonderful trip, but this time, my eyes were more observant to other things. Things that were slightly depressing. Everywhere we went , we saw miles and miles of  corn fields. i assume this late in the year it was more than likely field corn, but may have been for people to enjoy to. Anyway, this corn was every bit of 10 feet tall. ears packed in closely, as far as the eye could see. The disturbing part came when we saw the occasional small signs along the road in front of the corn fields, bragging about it being from Great Lakes Hybrid, Chemgro, and a few other names that are escaping my memory at the moment. All from GMO seed. Genetically modified! I have read only bad about this stuff. One article I read said scientist modify the seed for different traits. One was kind of like a time bomb in the DNA of the seed so that farmers can not save the seed to use from year to year. The plants produce sterile seed. This is called a "terminator seed". Other seeds  with the chemical Round Up gene.
    Monsanto is the largest producer of these GMO seeds. They have also been the manufacturer of chemicals that have been the most destructive to mankind. Such as Agent Orange. The toxins these seed produce are even found in fetal tissue. SCARY! huh? Read the article found at this link:
http://articles.mercola.com/sites/articles/archive/2011/10/05/has-any-company-ever-harmed-the-planet-more-than-this.aspx
    Do your on research, and be informed. The health of our loved ones are at stake. I was really expecting the Amish would save their own seed from year to year as the old farmers of our past did. I never dreamed they had gotten as commercialized as most of the farmers providing our foods now-a-days. Dont take me wrong. I am not just coming down on the Amish, its just that I expecting them of all people to be different. This eye opener is going to make me work even harder at using only open pollinated seed, and save my own. However, all in all, I still love the area.

Tuesday, September 24, 2013

A New Toddler Quilt

   My son's girlfriend wanted a quilt for her two year old daughter that was small enough for her to drag around, but big enough to cover her. She picked out a Dresden plate design she seen on the internet. It was one large plate, so wouldn't be big enough by itself. So I added some borders and corner treatments. Here is what I came up with:
Remember you can click on it to enlarge. Her name is Cadence, so I added her name in the bottom right corner.


I still don't have my markings washed out yet. The quilt is far from perfect. I am sorry to say, most times I am not a perfectionist at heart. I started this by cutting out the pieces before we went  to Pigeon Forge, TN for our yearly trip to the car show. I pieced and quilted it entirely by hand. I started piecing on the way down the 9 hr trip. Then worked on it of an evening while sitting outside on the patio in front of our fifth wheel. Then finished it just yesterday by applying the binding and stitching her name.

I like how the quilting on the dresden plate makes it look almost rounded, and more like a Dahlia. I loved working on this pattern. A Dresden plate is quite fun to do, and works up fairly quickly. My kind of quilt,lol

 A lot of the time, I was stressing these ol eyes out by working in low light conditions. Sometimes straying from my markings. However this isnt too noticeable unless one looks close. This is the first time I have  used multiple quilting designs. Most of the time it was an overall shadow quilting, etc. She is getting this for her 2nd  birthday in a few days.

Wednesday, August 28, 2013

Do We Really Know What We're Eating?

      Sometimes, I think it might be better NOT to know. when you actually take time to think about it, it can make you sick to your stomach. Every once in awhile I will hear of some strange ingredient that the FDA allows in our food. Thats the key word..."ALLOWS"!  It is absolutely shocking and appalling to think about what we are putting in our mouths. Be warned though, you may want to stop reading now, while you still have an appetite.
       Many....many years ago, while I was in high school, I read that red dye Carmine was derived from beetles. I quit eating red jello. admittedly tho, as I got older, I forgot about it.......mostly. Sometimes its one of those things you just try NOT to think about.  However, its one of those truths that we are not told about. Carmine,and Cochineal are made from ground beetles! It is used as a dye in many red juices, candies, cosmetics and more. You might want to start reading your labels.
                      check this out: http://www.snopes.com/food/ingredient/bugjuice.asp
       Just this morning, I found this article: http://www.huffingtonpost.com/2010/10/26/fda-approved-rat-hairs-an_n_773608.html#s165326title=Pizza_Sauce_30 . I know its by Huffington Post. Not my favorite read. They like to lead off with misleading titles to draw you into a vague or stupid article, but this one has links to the FDA's website. Check it out.
        Yesterday, I read that L-cysteine is used in many bread doughs as a dough conditioner. L-Cysteine is derived from human hair, hog hair,and avian feathers. I dont know about you, but I never have to sweep my floor after a haircut to make my homemade bread.....yuck! Check out this post below and be sure and read some more on your own.
               http://www.vrg.org/blog/2013/04/22/information-about-l-cysteine/
               http://www.vrg.org/blog/2011/03/09/l-cysteine-in-bread-products-still-mostly-sourced-from-human-hair-duck-feathers-hog-hair/
              http://www.eatlikenoone.com/l-cysteine-a-dough-softener-made-from-feathers-and-hair.htm
I checked my bag of sunbeam bread and thank God, I didnt see it listed, but who knows what else is "allowed" in there that is NOT listed.
         Grandma did it right. almost everything was made from scratch at home. Some used to and still do, grind their own flour. Milked their own cows. Canned their own produce, and sat back and enjoyed their meals without a second thought.
        As I am researching and writing this article, my thoughts keep drifting to a 70's movie called "Soylent Green", starring Charleton Heston. A futuristic movie about how  food is in short supply, and the people find out the high protein green wafer they have been eating is made from HUMAN REMAINS.  Then you remember when you watched old movies about people traveling to space, and how we thought THAT would NEVER happen.


Sunday, August 25, 2013

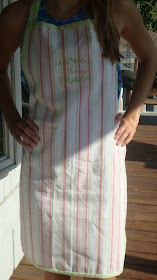
New Apron, and I Am Ready To Cook!

     Today, I put together my first apron. I have been wanting one for some time, but I never seem to find time to sew for myself. a few days ago, I was frying something and ended up with grease spots on my shirt. Admittedly, a little Dawn got the out, but thats beside the point. After thinking I ruined my top, I decided it had to be done. This time I didnt even look for my least favorite scraps as I sometimes tend to do for crafting for my personal use,lol. Does anyone else do this? Save your nice fabrics for everyone else?
     Anyway, I started a pin board with a few aprons that I liked. This time, I used the free pattern and tutorial from here: http://thecraftsdept.marthastewart.com/2010/06/apron-tutorial.html
next time, I am going to draft my own that will have an oval bottom that curves upwards towards the back, and a nice pretty ruffle.
The embroidery frame around my name is my own digitized design.
My tiny, little 24 yo daughter is being gracious enough to model it for me.


Saturday, August 17, 2013

Huge Harvest For August

     I have gotten  two small tomato pickings that got me 11 pints of tomato sauce each. Barely enough to bother canning. Today, a large amount became ready at once. These baskets are (I believe) half bushel each. Today I picked almost two very full baskets of tomatoes. About a bushel. I also picked some onion, and a cucumber and some hot peppers. The hot peppers are Big Thai. This is my first yr with these, and I dont know if they get bigger or not. Probably should have left them awhile longer but I want to make a few jars of salsa too. Oh and my Golden galia melon finally dropped, but I am sick with bronchitis and didnt notice when it dropped, and one side cracked open and had some bugs. the good side is soooo sweet and juicy. Delicious!
The large one is Omar's Lebanese


Do you think it's a BOY?


Friday, August 09, 2013

Wondercide, All Natural Flea Killer

       My son recently purchased another flea killer for his two  maltese babies. When he got these dogs about 4 yrs ago,  he started using the stuff that just goes on the back of the neck. It worked very well then. He could apply once and get protection for most of the season. Then the next time he ordered, it didnt help at all. So he tried a different brand. Still no relief. His dogs were still getting fleas, even with flea shampoos. He has been concerned about using all these chemicals on them. The warning labels will say to be careful not to get it on your hands, and to wash your hand thoroughly after application , etc. Makes you wonder if you have to be so careful with your own safety, how safe is this for your pets.
       So he hit the web again. He happened upon a product called  "Evolv" by Wondercide. Don't confuse this with the "Evolve"  (notice the "e" on the end) a chemical product by Seargents Pet Care . That is NOT what you want. He researched the reviews. It seemed customers had only good things to say about the product. so he ordered.
       The product arrived yesterday. It was well packaged and arrived much sooner than expected.  We were all a little skeptical about how well it would perform. Since it was all natural, we expected it might take a little time for it ti kill the fleas. As even with the strong chemicals, he would it them with strong blasts and they would keep on trucking, doing their best to hide. I think I even saw one flea High Five his buddy, snickering while he ran away. Well......almost,lol.
        Anyway, he picked up the bottle and started spraying. To see how effective it was going to be, he looked for a flea and give it a quick light spray. Lo and behold, that little bugger stopped dead in its tracks. he continued spraying covering the dogs coat and rubbing it through the dog's coat, watching as they died on contact. Unbelievable! The directions say to spray every 2-3 days or as needed to kill and repel fleas, ticks, and mosquitoes. It says it kills adults eggs, larvae, and pupae. It is a treatment AND a preventative.
        According to their flyer, Wondercide was formed in 2008 When their dog Luna (10 yrs old)  became deathly ill from pesticide poisoning. She was being treated monthly with flea and tick treatment. She started suffering from seizures and chronic skin issues.to liver and kidney failure. Luna's owner, determined to save her life,started extensive research and Wondercide was born. Today Luna is 14 and healthy.
       Evolv's ingredients are 90% hydrated silica. The active ingredient is said to " block the neurotransmitter octopamine killing and repelling insects instantly". It also states "octopamine is only found in insects, so it is safe for people and pets".
       I dont mean for this to sound like your typical commercials, because I am not receiving any compensation for this. I am doing it simply to share an amazing product.  I feel we are ALL exposed to too many chemicals in our lives. We are seeing dramatic increases in cancers, autism, etc. We have to start taking control of ours, and our loved ones health. The FDA and other chemical pushers are dropping the ball. All in the name of the all mighty dollar. So take a look at their website. Read the reviews. Do your research. I am sure you will be just as happy with their products as we are, and I am sure your pets will love you for it.
         You can check out Evolv and all the other great, safe products by Wondercide by going to:
                                                  http://www.wondercide.com/
                 UPDATE:  Great News for Simple Pleasures Readers!!!
Wondercide has generously offered my readers a 10% discount when they order using coupon code:
                                                                      simplelife
          Enjoy a start on a healthy new life for your family!

Wednesday, August 07, 2013

Hip Purse For My Grand-daughter

       My 7 year old grand daughter had been wanting me to me her a new purse for a little while. Finally the other day while we were shopping, I decided to look for the fabric. I had her pick out her favorites. She loves dogs so this was an easy decision fer her. Good thing she chose, because I would have been looking a lot longer trying to make a choice. I wanted to embroider her name on it before construction, but my embroidery hardware was acting up. She didnt want to wait, so I finished it promptly. Yesterday, I was able to figure out a work-around on that glitch. But since it was already constructed it would be too difficult to hoop on the machine. So instead her little applique bone with her name was made into a patch. I stitched it on water soluble stabilizer then hand stitched it onto her purse. I think it came out very well, but more importantly she is very happy, so i am happy too.


Friday, August 02, 2013

First Of The Tomato Harvest for 2013

     I have been getting a few wonderful tomatoes here and there. Today, things are different. I went out to check on my patch of newly planted bush beans (Lewis). When I got there, I saw bunches of bright red , beautiful globes. I also picked a couple of cucumbers. These got a late start.

I also went thru the garden giving all my hungry plants their dose of Mittlieder weekly feed.

Wednesday, July 24, 2013

Unbelievable Growth With Mittleider Gardening Method

       I recently returned from a 10 day trip to Myrtle Beach, SC. We had a fabulous time with my grown children and their children. before I left I strung 2 more rows of strings above my pole beans so they would have something to grab onto. i have been busy and havent gotten it all done yet. Next year I plan on building a trellis for them from metal pipe frame with a strung grid. Like you see on Reaganite71 youtube video .HERE. Anyway, when I left they were only about 1.5 ft tall. When I got back, I was SHOCKED to see this:
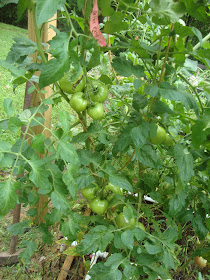
Look at how tall the beans are on my 6 ft tall poles! The ones in the middle just look short because they have sprawled everywhere, since they ran out of string to climb on. I dont know if I can get them untangled or not. Holy Cow! At least 4 ft of growth in only 10 days! Unbelievable. Check out my tomatoes:


This is the most tomatoes I have seen on my tomatoes plants before. and there's still more coming! The vines are now OVER 8 ft tall.
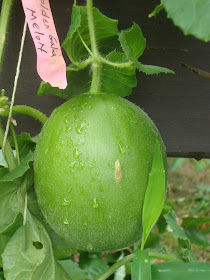
Look at this beautiful Golden Gala Melon growing vertically. It is about 8" long and about 8" wide right now. I cant wait for it to ripen. Growing vertically takes up so much less room, and is sooo easy.

Look at this beautiful Sugar Baby Watermelon growing vertically. It is about 6" across so far.
This is just one of the Charleston Gray Watermelons growing along the ground. I have decided to let them sprawl since they are supposed to get very large. This is the first time I have been able to grow any kind of melons.


Next year I have to do some renovating of the garden. I didnt really anticipate the Mittleider Method being so productive. I have to make more room between some beds, and I think I will make my 5 ft wide tomato bed narrower. I thought three rows deep would be easily handled. WRONG! I have to learn to follow the Method, and not wing things so much. I spent too much time on the irrigation this year, expecting a dry, hot season like last yr, but this year has gone to the extreme. It has been very wet. so I didnt get as much done to trellis's etc. I will work more on the irrigation and trellis's next season. I also didnt get as much brocolli as I wanted. Oh dont think it didnt grow. It grew fabulous. But by the time I returned from the beach, it had gone to seed. next yr I will wait to Fall growing season on these. Now I have more room for some bush beans. I have to be making plans for the Fall garden too.

For more information on the Mittleider Method i am experimenting with this yr, check out the links on my side bar.