Hurray, I got my hands dirty and all is right with the world. After some research I found out that it was time to start my onions. I don't have a cold frame, and after reading how much effort they take to watch the temps etc, I am not sure I want to fool with one. So I decided to set up a lighted rack to start seeds in.
I went on line and checked out the prices and sizes of shelving units at Lowe's, Home Depot, Big Lots, and Walmart. All are local for me. Home Depot ended up with the best buy. I was going to use 4 foot shop lights, so I wanted a shelf as close to 4 feet wide as possible. Home Depot had one that was 36" wide and was only $19.98. The web showed they had it in stock at my store, but I called to be sure. They checked the SKU number and assured me they had some. For the lights, I went with T8 48" shop lights. For right now I just got 2. They plug in, so all you have to do is put in the bulbs and plug them in. These lights cost about $14 each, then about $7 ( I think) for a 2 pack of bulbs for each light.
When I arrived at Home Depot, I was greeted and asked if I needed any help. They directed me to the correct aisle for the shelving unit. I looked there and a couple of other aisles, but couldnt find the correct unit. So I asked for help. They checked the SKU number and said they had 2, but were unable to find them. So they called the manager over. He looked, and double checked that their machine said they were supposed to be in stock. Unable to find them, the manager offered to sell me the same unit, only bigger, that was priced at $34.99 for the price of the other one. What a bargain ! What a store! I went back later and bought 3 gallon of paint for my living room.
This is the shelf I planned on getting:

Here is where it can be found: Home Depot
Here is what I got:
It can be found here: Home Depot
This evening I put the rack together, and hung the lights. It couldnt be easier. The legs just shoved into the shelves, and you start stacking. The lights are all ready to plug the bulbs in and hang from the unit. There were already some small holes along the underneath edges of the shelves. I was able to easily screw the hook into the bottom of the shelf on each end to hang the lights from adjustable chains that came with them. And wala! Its done.
The colors are inverted on this, but I think it made it a little clearer to see how it hung from the shelf. I dont know why the pic keeps coming up sideways tho...Sorry.
I filled my tray with seed starting mix, and watered, and watered. This soil takes a good while to soak up the water. I also allow some to lay in the bottom tray.
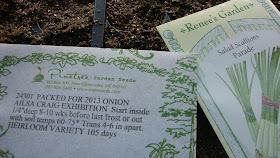
Got out my onion seeds.
The left packet is from Pinetree Seed Company. I ordered several varieties from here. This is the first time I ordered from them.
I also get seeds from Renee, at Renee's Garden for the past few years. I want you to know that I am offered these seeds free of charge for advertisement purposes. But that doesn't matter to me. Her seeds have a generous amount, for a great value.I also love the old fashion look to her seed packets. They always germinate very well for me too.
Here is what the set-up looks like with the lights out. I think it showed up better on screen that way.
You hang the lights just high enough to clear the tray with its lid on. I checked the bulbs and was able to touch them directly and they were just barely warm. After the seedlings start to grow, I will remove the lid, and let the air in. I will need to keep moving the lights up above the top of the plants until they can be planted out.
The lights hang over each end about 7". So that isn't too bad. It was so much fun getting to play in the dirt again. I have been drooling over seed catalogs, ordering seeds, and making plans for the potager again. But its way too early for the best part.......dirty hands,lol.


I like your home-made greenhouse. I've check similar ones and they can cost up to $100! FYI-I went to a seed-starting class and they suggested that you add water to the bag of soil first and then, once it is soaked in, put it into the trays. That way there is less of a mess.
ReplyDeleteThanks for stopping by. My seed rack is now filled to the max. Your right, i should mix in water first. That seed starting mix is so full of peat, it takes quite awhile to get it to soak in the water.
Delete