If you have never tried Kombucha you are in for a treat. Its full of healthy probiotics for your digestive system. It is fizzy and makes a wonderful sub for sodas. My daughter talked me into trying it the first time after she bought it in Walmart. She became excited when she read on the label it was Raw and Organic. This was GT Synergy Kombucha in a few different flavors. I have tried to reserve it for when I am out running around shopping as it is kind of expensive. It runs just a little over $3 a bottle.
This is what it looks like. In my walmart it is found near the mushrooms, tofu etc.
It is a fermented tea that has been around for over 2000 years.There are many health benefits touted for kombucha. From inproved digestion, weight loss, strengthens immunity, fighting yeast overgrowth, liver detox, and aides prevention and treatment of arthritis. There is lots of information out there. I have very limited experience with it, and have not drank it regularly. However, i have noticed it helps to settle my tummy and helps cravings. Plus, its just a good tasty drink.
You must have a scoby or "Symbiotic Culture Of Bacteria and Yeast". This is called the "mother" because as it ages it produces "babies" to make more or give away.
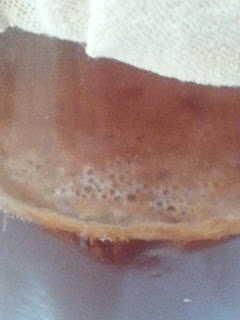
In this Qourt jar I am growing my first scoby using GT Synergy Kombucha. See the light colored ring around the top of the liquid? I have read many comments online that said you have to use unflavored Kombucha to grow your own, plus others that say the new version of GT's can no longer be used because of a new formula. I am here to debunk both of these.

I started by sterilizing my quart jar in boiling water and setting it aside to cool. In a pot, I placed 4 tea bags (3 green tea, and 1 black), and 2 cups water. You can not use tap water if your have city water since it is chlorinated and this will kill the good bacteria. I have well water without added chlorine etc so I used my tap. Otherwise use bottle water. I bring this to a boil then turn it off. i added 1/3 cup sugar and stirred then let it steep for couple of hours. I also understand you can NOT use decaffinated tea. The scoby uses the caffiene and sugar to grow. so that in the end of the process there is very little if any of the two remaining in your finished kombucha. After steeping I removed the tea bags and let the tea finish cooling. It has to cool completely before adding your store bought kombucha. The heat will kill the good bacteria. I poured out all but the last 1/4th or so of two bottles of kombucha leaving the stringy stuff in the bottom. I have read where others use one bottle, but I had it so i used two. Do not drink the excess out of the bottles, pour them in a drinking glass. You dont want to contaminate your tea from bacteria from your mouth. Pour the remainder of the kombucha that you saved into your quart jar with your tea. Cover this with a towel and rubber band to hold it on. Depending on how warm your house it, it may take 2 weeks or more to grow your scoby. i left mine two weeks. I probably should have left it another week however, cause my scoby was a little thin. I am inpatient so I hope its thick enough. I read it should be 1/4" thick. Mine was about 1/2 that.

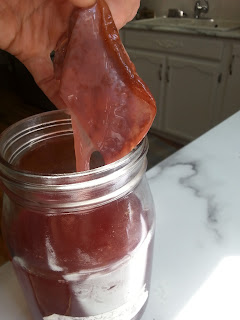
Here is my scoby when I pulled it out of my quart jar. Be sure and use clean washed hands before handling. It is kind or rubbery feeling. Do not use any metal with your scoby.
When your scoby has grown, now you can start to brew your kombucha. I already had bags of green tea and a box of organic tea blends. I decided to get creative with my first batch and mix these. I used 10 total tea bags and an old 1 gallon pickle jar I had gotten from a deli once for free. Wash
your jar, rinse it thoroughly and I also sterilized it in some boiling water. I then boiled about a quart of water with 8 green tea bags and two flavored black tea for total of 10 -12 bags. When it has started boiling I add 1 cup sugar and stir it in, then let it sit and steep for 15 min to an hour. I steeped for an hour. Then remove your bags and pour into your big glass jar that is at least 1 gallon. then pour in your remaining 3 quarts of cold water to finish cooling your tea. Make sure it is cool before next step. Pour in your scoby from your quart jar with about 1.5 to 2 cups of the tea it was grown in.

You can see my tiny scoby floating in the top in this picture.
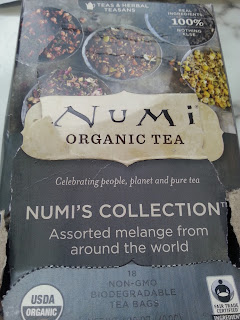
This is the box of flavored teas I used. I picked out the cardamom pu-erh bag and a Numi Golden Chai bag that had black tea, cinnamon, ginger, anise, and cardamom. It smelled so good. Cover with towel and rubber band. Place in a warm dark place. Let ferment for a week or two. After a week, take a straw and insert along the edge of your scoby, place your finger over the end to pull some tea out. Check the taste. if it is too sweet ir needs to ferment longer. If you let it go too long it will start to taste more vinegary. So check frequently after a week. When ready it can be drank now but will not be flavored or fizzy.
In my next post, I will explain about getting the fizz and flavoring in your second ferment.


