"Life is not measured by the number of breaths you take but by the moments that take your breath away?"

Author: Unknown
Showing posts with label crafts. Show all posts

Monday, June 30, 2014

Crochet Honey Bee Tutorial

     I am starting on making an embroidered pin cushion with emery filled part for needle sharpening. I want it to be a nature theme. One of the parts I am attaching is a small honey bee. I am including the pattern below if anyone wants to give it a try.
Materials:
      1 mm / USA 10 crochet hook
       size 10 crochet thread in black, white, and yellow

I will embroider legs when I attach to the pin cushion.
1. With black thread, ch 4, 8 half double crochet (hdc) in 3rd chain (CH) from hook. 
2. Slip stitch to join (ss) in top of turning chain (ch) . ch2
3, hdc in next 2 hdc, 2 hdc in next hdc. hdc in next 2 hdc, 2 hdc in next stitch (st). 2 hdc in last st. Join with ss to turning ch.

4. Chain colors to yellow. ch2. hdc in next 10 hdc and ss to join in urning ch.

5. Attach black again. ch 2. hdc around and join.

6. ch 1 , *sc in next st, skip 1, sc in next.* Repeat from* to * around. SS to join.
7. ch 2, 2 hdc in each st around. ss to join. 
8. ch 2 , 2 hdc in each around, ss to join.
9. ch 2, hdc in each around. ss to join
10. ss in second st , skip 2, ss again  in next st. skip 2 and ss again in next. pull end of yarn thru loop snugly.

wings: make 2 in white)
1. ch 3, dc in 3rd ch from hook. 
2. ch 3 and turn work. dc in middle dc below, ch 2 , dc again in same space. ch 2 and ss in turning ch. pull end thru loop. 
make two and tie together. Then attach to top of bee body. Pull some black thread thru head to make antennas. 

I hope you find these instructions helpful. i would love to see how yours turns out.

Tuesday, December 24, 2013

Learning A New Craft

        For the about the past month, I have been researching a new interest. I plan on trying out Crazy Quilting for the first time.  friend peaked my interest in it. I had thought about it before, but just didnt think I would have the patience to do all the stitching that would be required in doing a quilt. I had a  "duh" moment when she mentioned just doing a pillow. I dont know why I never thought of that before, but i got excited over the prospect. Here is her webpage.
   During my time researching crazy quilting, I seen several pinned samples of blocks done with tatted pieces. Tatting is another thing I once thought of trying many years ago, but never got around to buying a shuttle. To be honest , it seemed a little difficult when I seen pictures of someone working with a shuttle. Then I came upon a youtube video HERE. I couldnt understand a thing she was saying. Well maybe a word here and there. But her video was excellent to follow. What I noticed was that you could also tat with a needle. I didnt need to learn to use a shuttle! She  made the needle tatting look very easy. Plus I love the delicate look of the lace. She is making earrings, but I thought these pieces would look very nice on my crazy quilt block.
     Then , I found this series of videos HERE. I liked her finger positioning technique. She was able to move very quickly. So with her  video's and the other's I watched, I managed to start a piece. This is only a segment of the earring piece, but it is coming along nicely. Especially considering this is my very first attempt at tatting.

Saturday, December 22, 2012

Little Crochet Acorns

My daughter showed me a pic of some crochet acorn's that she found on the computer tonight. She fell in love with them, and wanted some. She asked if I could make them. well a couple hours later while watching a Christmas show on TV, this is what i came up with:
They work up very quickly and easily. here is basically how i did them.
1. Ch 2, 4 sc in first ch , join to first sc and ch 1
2. Sc in same joining space, and sc in same space again. Continue with 2 sc in each sc of row below.Join,
    ch 1
3. Sc in same joining space, and sc in same space again. 2 sc in each sc of row below. Join, and ch 1
4. Sc  in each sc in row below. Join, ch 1 . Repeat this row 6 more times. Tie off.
5. Now for the cap. Ch 17, and join. Make sure this loop will fit around the top of your acorn. if it doesnt 
     easily, separate and add or subtract a chain. Ch 1
6. Sc in each ch, join, and ch 1. repeat this row once more.
7. Skip next sc and sc in next one. Skip one sc, and sc in the next. Continue around , not joining, just 
     working in a spiral.
8.Continue  step 7 until you reach the very tip, and creat a little nub at the top, cut, and pull end thru loop.
9. Put a little bit of glue around the inside edge of cap. Stuff acorn, and push cap on and let dry.

Wouldnt these look adorable strung on twine to form garland and hung on the tree, or mantle? Or how about filling a little basket or bowl?Or even in a small nest and placed on the tree?


Saturday, November 17, 2012

Crochet Edging Detail for Blanket

       I recently got on a kick working with crochet thread. I wanted to try my hand at edging a baby blanket. I have used the thread before to make lace to sew onto hand towels, but havent done a blanket, ad its been many years since I did that. I have been researching some free patterns on the web, but I hadnt had much luck at finding exactly like I wanted. I did find one, and started with it, but quickly decided to wing my own design. I believe it came out pretty good.


Here is how I did it. I took a piece of flannel, and cut it off full width by 34" long. then with the four corners layered on top of each other, lay a large plate up against the corner and cut it off with a rotary cutter to round the corners. Fold over edge about 1/4"  and stitch down. No attach number 10 crochet thread  by pushing a number 6 crochet hook into blanket below hem about 1/4" down from edge. Now single crochet (sc) all around edge of blanket with right sides facing, and join in first sc with a slipstitch.
       NOTE: you can also make this double thickness by sewing two pieces together , right sides facing, then leave an opening for turning. Press edges, and then do the sc.

ROW  1. chain 5, dc in base of ch 5, chain 3, * double crochet (dc) in 3rd sc from hook., chain 3, dc in 3rd sc from hook, chain 3, dc in same sc, chain 3.*. Repeat around and join with slip stitch in 3rd chain on starting chain 5.

ROW 2: Slip stitch into chain 3 space of 2 dc grouping ( as seen in step B notice the "V" shape formed by 2 dc in A)) , Chain 3, *  dc,chain 3, wrap yarn around needle to dc in ch 3 space below working close to bar of dc below, pull up a thread, yarn over, drow thru two loops and leave 2 loops on hook, do the again just to left of last partial dc, repeat into top of dc in row below, and do two more times in chain 3 space just to the left, then warp your needle and draw thru all loops on hook to make a cluster ( as seen in steps 1 thru 5) .chain 3, and dc in center of chain 3 space of two dc cluster in row below. * repeat to end and join with slip stitch into 3rd ch of beginning ch 3.


ROW 3:  ch 3, do * 8 dc in ch 3 space as shown in A, ch 2 sc into top of cluster below as seen in B, ch 2, 8 dc into next ch 3 space of the "V" as seen in A. repeat from * around to end, chain 2 and slipstitch into third chain that started row. tie off.


Monday, November 12, 2012

Crochet Towel Edging Tutorial

     This morning I worked on the edging for the matching towel. I got t comleted in short time, and took photo's along the way to show you how it's done. I used No. 10 size crochet thread. You will also need a large eyed darning needle for the blanket stitch.
1. In step one, you will thread your needle and tie it off to the left corner of the towel with right sides facing you.
2. Do a blanket stitch along the edge of the towel keeping stitches about 1/4" to 3/8"  apart. Keep stitches even, and an even tension.


3. When you get to the opposite corner, tie your end with the needle attach to your  new working thread from you ball of thread. Now we are going to crochet.
4. Chain 6 and double crochet (dc) into the next space of the blanket stitch.
.
5. Chain 2 and dc in the next blanket stitch as shown above. Continue this across being sure to place a dc in the very end/corner .Chain 1 and turn.
6. Now single crochet (sc) in the first dc, then 2 sc in the chain 2 space. sc in the next dc. Continue this across to the end as shown above.
7. Chain 4 and turn. dc into the 4th chain from hook, and do 2 more in same space. As shown above.
8. dc in the 4th sc in row below. chain 3, and do 3 dc around the bar made by the last dc. Note how the 3 dc wrap around the entire dc bar.
9. dc into 4th sc in row below. Chain 3 and do 3 dc around the last dc bar again. repeat this process across row.
 Note: I had to occasionally dc in the 5th sc in row below to make sure I had no rippling. When you get close to the end, check out your spacing, You will want to end with a dc in the very end of the row, so you made need to change the spacing in the last two spaces of sc row below to get that end dc. This is due to variance in towel width and in your blanket stitches. You wont notice the difference tho. When you get to the end tie off thread and weave in your end.


Sunday, November 11, 2012

Crochet Towel Edging


     Last night I decided to start practicing again with crochet edging. I havent done it in a long time, but I thought it would make a wonderful edge treatment for some flannel or fleece baby quilts. Here are some pics of how well it turned out. I think I am going to put together a tutorial for it in the next few days.

Latest Baby Boy Quilt

        I just completed my second quilt for a baby boy. Seems like this family has seen more little girls being born. I kinda re-designed the first pinwheel quilt I did , and added some little boy touches. I also tried out some free form quilting that I hadnt done yet. I combined quilt in the ditch with it. I am getting better at it. I still had a few small tucks in the back that I had to hide, but not too bad.

Also the applique puppy face in the center is one of my new designs that I am going to add for sale on my embroidery design site.


Saturday, November 03, 2012

Sewing Room Re-do and Organization/ Mini Fabric Bolts

     Stay tuned to this post for updates for organization ideas for the sewing/craft room. I am in the process of re-organizing my sewing room and taking over a now empty bedroom. You know......the old empty nest thing.
      I have to admit....ashamedly so, that my sewing room looks like Hurricane Sandy made a brief stop. I have been into other things, and have neglected my little sewing "closet".  In my last post I told you it is a little room about 6'x10'. Just a small spare room I "throw" my stuff in. A lot of unfinished projects, and left over mess from finished ones. It has gotten so bad, that the last two baby quilts I have been working on, I took over the dining room table. I lugged my big ol sewing/embroidery machine into the dining room, and scattered fabric pieces everywhere,lol. Well after reading some recent blog post about how others are organizing their fabrics, I finally decided to tackle this room.
     I have HAD my fabrics folded neatly into piles and placed onto my shelving unit. But everytime I get into a project and start pulling fabrics, these piles get rummaged around everywhere, like  the shelves in Walmart on Black Friday. Just without the bodies laying in the aisles, at least none that I have found, and I think everyone is accounted for. Although in this mess, one could never be sure.
     Last night, i came upon several posts where sewers are using mini fabric bolts for their fabrics.  At first i wasnt so sure it would be necessary. Why wouldnt nice neat piles like I see in other blogs work for me? Well duhhh.... It doesnt!  Disorganized, messy, rushed.......my middle names,lol. The bolt method would be perfect. Nice neat little bundles that will stay wrapped unless I am too lazy to even get that done. No.... I think i can.. I  think i can.
      OK, here it is.....my little sewing closet.( my new walk in closet in my bedroom is bigger than this). Now hold onto your wallets.....I wasnt hit by a hurricane......no donations needed here. And believe me, everywhere else my home is pretty tidy........most times. Except for when I get into something......like my kitchen while canning:
No Hurley, that was not a lie:
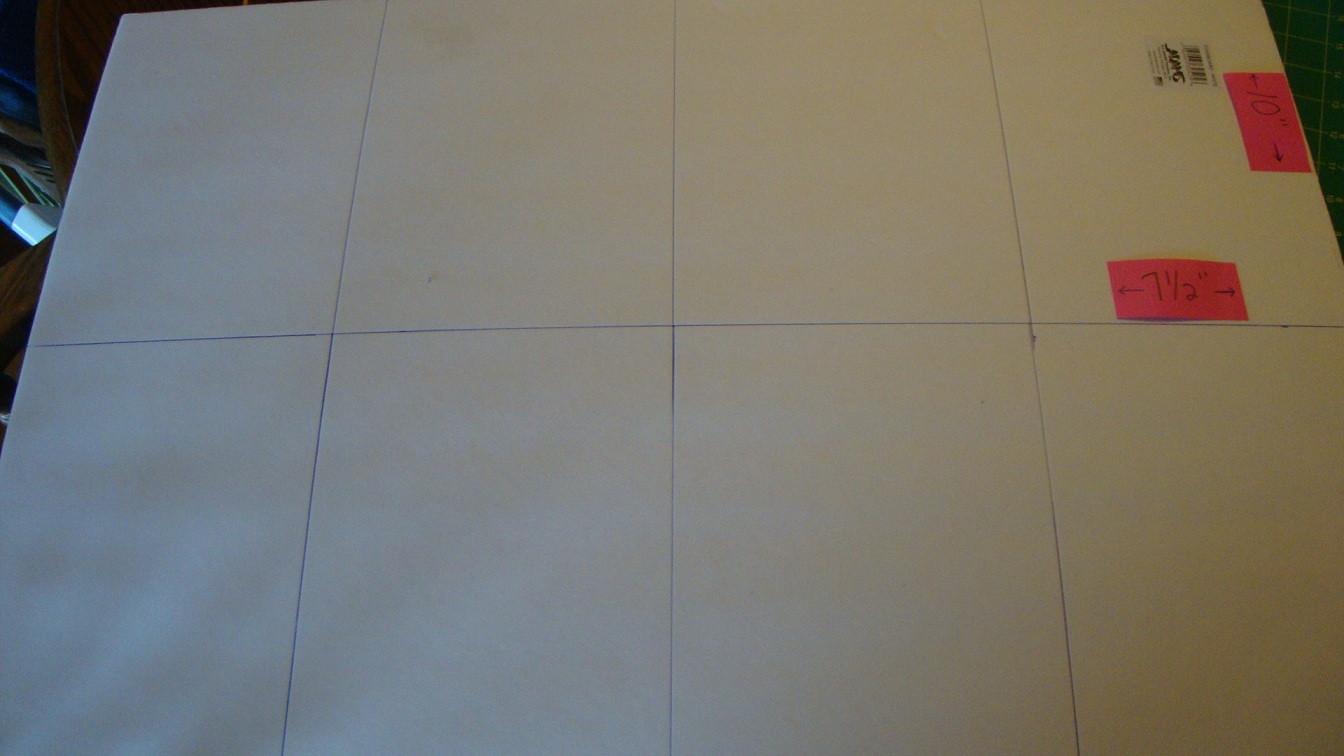
Anyway, back to the mini fabric bolts. Some were using comic book backing boards. These run about $12 without shipping for 100. Most were using boards that were 7.5 x 10. Some were cutting cardboard, others were using the foam core board. At first i was going to order the backing boards, but I was too impatient to get started. We were going shopping this morning, so I stopped at our local Deals. Its kind of a cross between Big lots and the Dollar Store. They had the foam core board there. Sheets 20"x 30" for only a dollar.  For now i bought 6 sheets. I marked these off and was able to get 8 boards per sheet. So thats  48 boards. 
I cut them out with my large cutting mat and a rotary cutter with an old blade. here is my nice stack of boards:

For an average width piece of fabric, I leave it folded in half as it comes on the bolt, and then lay it out on my table. I lay my 8 " wide big ruler on it, and then fold up the selvage edge over the ruler, and then the folded edge down over this. Folding it into neat thirds. Slip the ruler out, then line up a board over this, and start rolling. Secure the edge with a pin or two. and Wala!......
Oh i almost forgot....(well kinda) here is my sewing disaster as it is now:
And this show doesnt have my Husqvarna designer 1 in there, as its on the dining room table ready to quilt a baby quilt.
And here is the start of my nice neat bookcase, in my new sewing room with a small part of my fabrics neatly folded on their mini bolts:

Now isnt that purty!
Stay tuned and check out Pinterest for more organization and sewing room ideas. Meanwhile, I gotta get more boards and tackle the rest of my mounds of fabric.


Kids are Gone, and Mom's Taking Over

         For many years I have made due with a tiny closet of a sewing room. its about 6'x10'. I am a very disorganized person even on a good day. I am into a lot of different craft forms as well. so I have supplies from craft projects, sewing, knitting, paper crafts, and embroidery. and admittedly, I hate to throw anything away. I had a very frugal upbringing, and tend to think " I might need that someday". No matter how small or cheap the item. I am trying to get away from a lot of that thinking. tackling a room every now and then throwing things away. Now its time for the sewing room. Now i have room to put things.
        I am a grandma of 4, and 4 of my 5 children have now moved out on their own. So my once 6 bedroom home has some empty, or almost empty rooms. If the kids ever get the rest of their stuff,lol. I am wondering if they are leaving stuff just to "mark" their territory. Just in case they want to come back,lol. I have 4 bedrooms upstairs. One has been made into a home office of sorts. another project room in the waiting. There is also the master bedroom, which is now a completed project, and 2 other bedrooms. One I am leaving as a guest room ( if I can manage to get the rest of my daughter's things out), the other still has a few of another daughter's things,plus a full size bed. I would like to take that bed out, but for now I will probably leave it, and just make it up like a daybed for now, and make this 12x14 foot room into my sewing room extension. My sewing "closet" has my mounted tables below the window and along one wall. This is where i set my sewing and embroidery machines. But I want to put up a large work table in the bedroom, and bookshelves for my fabrics. Stay tuned for pictures and organization ideas for this major work in progress.

Saturday, October 06, 2012

New Walk-In Closet on The Way

        We have been in the middle of remodeling our bedroom for sometime. When you own a home, there is always something that needs fixed, or updated. Life always seems to get in the way and put a halt to things sometimes though. Several yrs ago we did the master bathroom, and about 2 months ago, we finally got around to the bedroom. admittedly the bedroom was a pretty big project. We used to have a little bump out with windows in it. We took the whole end wall out of the house on our bedroom, and rebuilt it. He made it straight across. He hung new wood siding, new gutter and installed new windows in our room as well. We also used to have a small room just off our bedroom with a large spa in it. This room was about 11x11. We dont have city water, and hauling water in to re-fill it regularly was getting to be a pain in the butt. So we pulled  out the spa and gave it to my son. We then raised the floor in it even with the bedroom. It was 2 steps down as it was on a tiled cement floor. The windows were removed and walls re-done and painted the same dusty, gray-green as the bedroom. The hardwood floors are on order and should be here by Tuesday. So for the last couple of days we have been building the cabinetry for the walk-in closet. Yes, even today......my 29th...mmmm  well 52 nd birthday.
     We had planned on just hanging the  store bought shelving units found in Lowes and Home Depot, until I seen the site below. As soon as we seen their closet, we knew we were going to do our best to make it ours.
Check this out! You have got to watch her cute video. She did a wonderful job, and on her closet too. Anyway, her closet was our inspiration.
In this photo we are starting to build our cabinets:
A few more done. Man does it take time to cut all these boards, figure up sizes, measure and remeasure.On the left wall we will leave open as the doorway comes thru here. There will be cabinetry on the other three walls.These pics are taken from the closet doorway looking in from the bedroom.
I know, it sure dont look like much.....yet.
And here we are still on the painting part of the project. I painted the back edges of the shelves before we pushed them up against the wall, so I wouldnt have to tape the walls off. The lady in the above link added backs to her cabinets, but we kinda wanted to see the green walls with the white cabinets. I thought that might be a nice contrast. I figured the sheet rock walls could always be painted white later if we wanted to, and you would never know the difference. 
Now all the cabinets are installed and painted their first coat. You need to paint one coat , let dry, then sand, and paint the final coat. The first coat of paint will raise the grain making the wood feel real rough. There is a load of difference when you do this light sanding. We also used some wood putty to fill in any knots that show on the rougher side of the plywood. It is 3/4 inch thick, and has one nice side, and one almost as nice side. We also took white caulking and filled in the where the edges of the shelves met the sides, so no cracks show. We wanted a nice smooth finish. Tomorrow we plan on getting all the trim installed except the floor molding.   We have to wait till the wood floor is down, before we can put it in. But trim on all the shelves and sides, and crown molding along the ceiling will happen tomorrow. When you used plywood, the edges always have to be covered with something. They arent pretty,lol. Then I will show off some more pics. Be prepared to be amazed!


Friday, September 21, 2012

Homemade HE Safe Laundry Soap

  A few months ago  I read a post on StoneGable blog about homemade laundry soap. I still had some bottles of bought soap put back that I had bought cheap with coupons, so didnt do anything with the information.  A couple of weeks ago, i started buying a few of the ingredients each time I went shopping. I thought about making half a batch to see if I liked it, but after dumping one whole box of the washing soda in my bag without thinking, I figured I would cut down on cost, till I see how it goes.
      I have made liquid laundry detergent before but it was too much of a pain in the butt to make. Now I have an HE machine and didnt think I could use powder detergent. So I did a little research online and found that the Duggers used a homemade powder detergent. I have to admit, I have only seen the show once or twice, but I figure if it works for them, why not try it. I also read comments by several that this was safe to use in an HE machine. Most advised to just throw the soap directly into the tub. From what I understand the reason for special detergent with HE is because the regular detergents suds up too much for these machines. I found that out once the hard way,lol.  These ingredients also do not suds up. Even so, I have read 100's of comments about how great this stuff cleans. Some have said it helps with the odor buildup in the HE machines. (that and keeping the door open when not in use). Some have commented that their clothes had begun to have a smell because of the HE machine, but this detergent has stopped that problem.
    Since I hadnt gotten quite all the ingredients, I also researched other recipes. Only one I have read (on Stonegable) called for Downey Unstoppables or similar product. I liked this idea so wanted to keep it. However I only had one bottle, but figured if others were having such good results without, one bottle should be fine and help keep the expense down. StoneGable also had Oxyclean in hers. another fantastic idea which I didnt find anywhere else. But again, I only had half of the recommended amount. So same as before, if it worked well without, I used half.

                                I also borrowed the label that Stonegable found and used.  
Here is the recipe that I adapted:
4 bars fels Naptha soap.........97 cents each at Walmart
             Note: I have since found Zote soap at Big Lots for around the same price, but it is twice
                       the size, and a pretty pink, with a nice smell.
2 jars Downey Unstoppables.......$4.76 at Walmart
1 Box 4 lb, 12 oz  Borax.............$3.38 at Walmart
1 box 4lb baking soda.......$2.12 at Walmart
             Note: I have read that Walmart has this in the pool section in large boxes cheaper
1 jar approx 1.5 lb jar of Oxyclean........$3.86 at Walmart
             Note: i have since found a "Sun" brand knock-off at Big Lots for only 2.50 
1 box 3 lb 7 oz Super washing soda.....$3.24 at Walmart
      Grate bars of soap. I used by hand grater since I couldnt find a part to my food processor. Then dump all ingredients into a garbage bag to mix thoroughly. Then pour into your special container.
total cost for materials was $21.24. i didnt figure up actual cost per load but someone on Stonegable using all the ingredients in her original recipe stated it worked out to .07 cents per load. a bottle of  27 load Gain detergent from Walmart costs $9.97. This works out to LESS  than (with my recipe) $1.89 (costs for other recipe) for same number of loads. I have already washed a load, and brought a handful of the towels in for my husband to smell. With the HE washer we occasionally have problems with a musty odor. I didnt tell him why I wanted him to smell them. he commented they smelled very fresh. THEN  I told him why.
By the way, I use 2 tablespoons per load. you gotta give this a try.

Another poster also mentioned that if you have hard water, add some epsom salts, or kosher salt to mix to soften water and help the detergent work better.

I am also going to use vinegar for fabric softener. once clothes are dry there is no vinegar odor. I also want to get some essential oils to add a little to the vinegar. Maybe even make my own by soaking some vanilla beans in the vinegar, or even lemon rinds.
                                                       

UPDATE: I recently found Zote, laundry soap at Big Lots for .90 a bar, and these bars are twice the size as the other. Also, i found Sun brand  oxyxlean for $2.50 a tub at the same place.

Sunday, January 22, 2012

Doggy Diaper for Small Females

   My adult kids have two Yorkies and two Maltese that have all but one,come into heat at the same time. They were out of disposable diapers to cut to fit. I think they really wanted to just save the expense. So they asked me if I could make them diapers like I made my DGD's for their dolls. So I got busy and drafted a simple pattern. So far I have made 3 of them, and they fit the dogs from 4 lb thru 7 lb. Be sure to check the measurements it prints out  against the ones I noted on pattern to be sure it prints the same size.

Doggy Diaper Pattern