And here some more shots to enjoy:
"Life is not measured by the number of breaths you take but by the moments that take your breath away?"
Author: Unknown
Monday, September 10, 2012
More of 2012 Car Show
I finally got a quick shot of the radio Flyer. Still got my fingers crossed for a better one:
Labels:
Vacations
Sunday, September 09, 2012
Another Step Towards Growing More of our Food
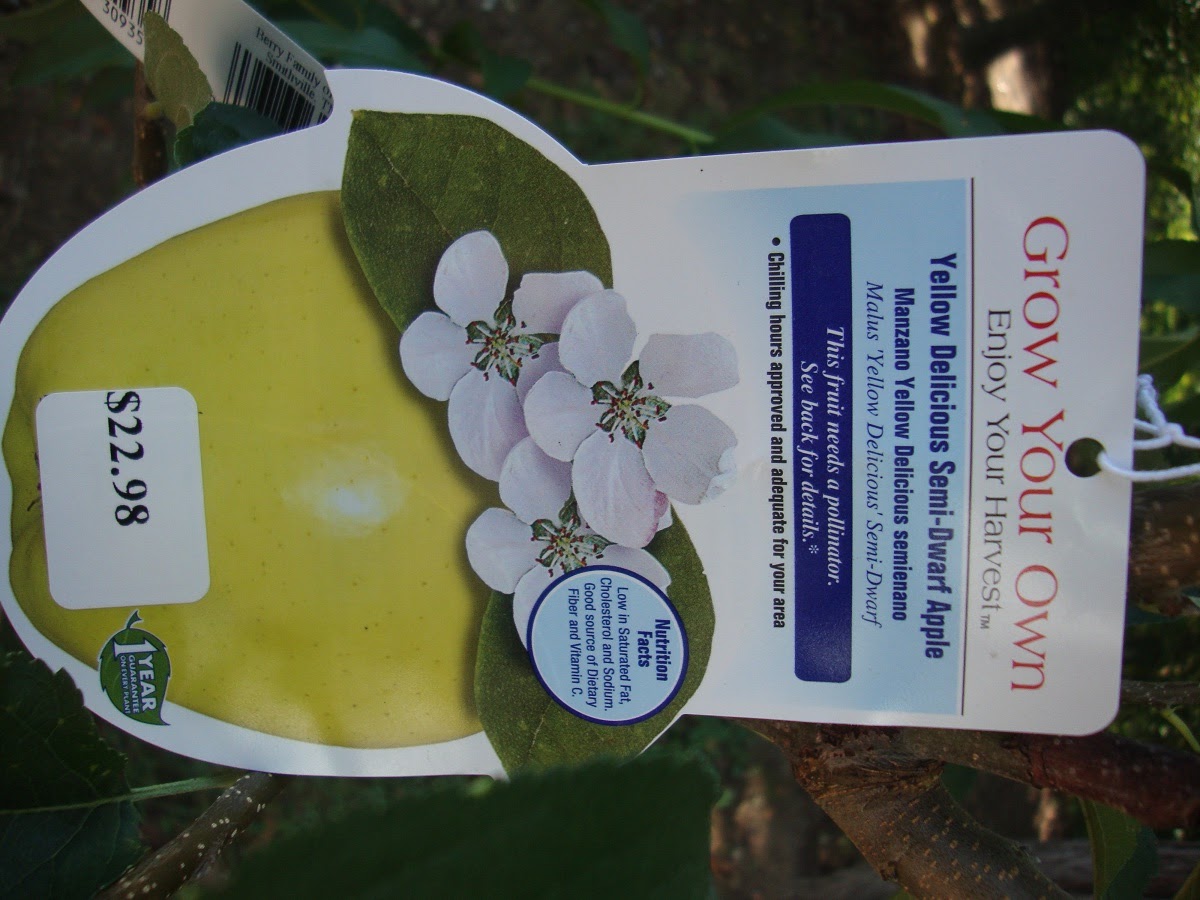
I have been making an attempt at growing more of our own food. I just think that the more we can produce on our own is healthier. Have you taken the time to read your labels, or listen to the news about how many more are sickened from contamination of our mass produced foods? Not a pleasant thought. My son recently bought a Jonagold apple tree and planted it in the front yard. We went shopping at Lowes yesterday and I found a couple of fruit trees at really good prices. Too good to pass up, even tho we have to haul them home in the back of the truck while pulling the fifth wheel. The apple tree is about 10 feet tall right now, and the peach is about 6 feet tall. both look very healthy.
For some reason this shot doesnt want to stay upright on upload. Sorry about that. I cant wait till these start bearing fruit. especially the peach. Here is a shot of the tags so I can remember the info on both.
Labels:
My Garden
Pigeon Forge, Shades of the Past
On this past Monday we made our yearly trip to Pigeon forge, Tn for their car show. My husband loves this. We will be here for 14 days. The first show starts Friday and runs thru Sunday. It is Shades of the Past. Then next Friday thru Sunday we have The Grand Rod Run. below is a little video I put together showing some of the cars we seen. i will add more pics as I get time.
This show depicts the broad range of characters that participate in car shows. Some are the restorers:
And some fall into the imaginative fun seekers, just here to entertain and be a part of the fun:
Some just like to share their little bit of the past, untouched, and allowed to age gracefully. Enjoyed for their true beauty:
Dont we all wish we could be appreciated like that. Unfortunately i missed getting a pic of the HUGE radio flyer wagon driven down the road, full of smiling faces. Hopefully they will still be here next weekend for the Grand Rod Run.
Labels:
Vacations
Tuesday, September 04, 2012
My first Machine Quilted Quilt
My niece is expecting her first child. Its a boy! Her baby shower is in October. I got to work on my first quilt for a boy. I also wanted to try machine quilting again. In the past it was a disaster. This time it turned out a little better. I did shadow quilting. I am not 100% satisfied with it, but at least this time I had no bunching. Next time I will try the meandering style quilting. We left yesterday morning for Pigeon Forge, Tn. I usually like to knit, or quilt on the way, to keep me busy. So i opted to bring it with me and finished the binding and brder quilting by hand on the way down. I was able to get this little quilt done within 2 and 1/2 days. not too shabby.

PS: A Thank You to Laura at Lullabelles View for her encouragement and instruction.
Monday, August 13, 2012
Canning Navy Beans an Ham
Another first for me. Canning dried navy beans. When I first heard of this, I admit it didnt make sense to me. couldnt understand why someone would take a product with a very long shelf life as it is and can it. But then I thought about it again. How many times had we wanted soup beans and cornbread, but not think about it till later in the day.? Then it made sense. If I forgot to start them early enough we could still have beans at a moments notice. We had them tonight for supper to test my product, and the soup bean eaters all gave a thumbs up. All two of us. Me and my husband. My son wont even try them. Below describes how I did them.
Soup Beans and Ham
approx 3 lbs dried navy beans
6 heaping TB chopped onion
6 heaping TB ketchup (might use a little more next time)
6 tsp salt. (a little too much for me. next time will reduce to about 1/2 tsp for each of the 6 jars , and add
more if needed when heating)
approx 6 cups chopped ham
6 quart jars, lids and rings
1. Pour beans into a pot and cover with plenty of water. Let beans soak over night.
2. The next morning heat beans to boiling and boil 2 minutes.
3. Pour 1 cup ham into the bottom of each jar.
4. Pour in beans to just below shoulder of jars, about 2.5" below rim.
5. Pour in 1 Tb of onion.
6 Place in 1 TB of ketchup.
7. Add 1 tsp ( or less , to taste).
8. Pour boiling water over everything leaving 1" head space.
9. Pull lids from simmering water and place one on each jar after cleaning rims well.
10. Hand tighten rings.
11. Process according to altitude for 90 minutes. I am about 800 feet altitude so i used 10 lbs pressure on my canner.
12. Then when ready to eat, just heat and serve.
I served with a warm pan of corn bread, fried potatoes, and canned peaches
Soup Beans and Ham
approx 3 lbs dried navy beans
6 heaping TB chopped onion
6 heaping TB ketchup (might use a little more next time)
6 tsp salt. (a little too much for me. next time will reduce to about 1/2 tsp for each of the 6 jars , and add
more if needed when heating)
approx 6 cups chopped ham
6 quart jars, lids and rings
1. Pour beans into a pot and cover with plenty of water. Let beans soak over night.
2. The next morning heat beans to boiling and boil 2 minutes.
3. Pour 1 cup ham into the bottom of each jar.
4. Pour in beans to just below shoulder of jars, about 2.5" below rim.
5. Pour in 1 Tb of onion.
6 Place in 1 TB of ketchup.
7. Add 1 tsp ( or less , to taste).
8. Pour boiling water over everything leaving 1" head space.
9. Pull lids from simmering water and place one on each jar after cleaning rims well.
10. Hand tighten rings.
11. Process according to altitude for 90 minutes. I am about 800 feet altitude so i used 10 lbs pressure on my canner.
12. Then when ready to eat, just heat and serve.
I served with a warm pan of corn bread, fried potatoes, and canned peaches
Labels:
canning
Note to self.......
This is just a note to myself for next year. I know my memory, and sometimes its not the best. When canning season comes around next year, and I get the bright idea to try and put corn up again, someone PLEASE lock me in my room. I am serious. The canning bug has gotten to me this yr, and I am trying to preserve a lot of different things. I have never done corn before. I have done green beans, jams,deer, and even raw pack chicken. But NEVER again to corn. I had a mess everywhere . The silk wasnt too bad. Got it cleaned up with a few quick swipes of the broom. Then it came time to cut it off the cob. it was on my face, in my hair, on my shirt, up my arms, all over the counter top, and a mess in the floor at my feet. Oh i forgot to mention my feet. Not to mention stepping on it as I stood at the counter,lol. Even my usual clean-up crew, the two maltese on my side-bar, ran for cover.
"But you love corn" I tried to remind them.
Calling for them several times while I stood on that sticky mess. They would come and sniff, and quickly leave. not a bite taken.
"Remember when I held a partial buttered ear for you while you quickly nibbled the moist buttery goodness."
"You loved it then", I pleaded.
They are usually so good about cleaning up messes. Waiting at my feet for me to drop something accidently, or on purpose. It was no use. I had to pull up my big girl britches and work my way thru the mess. it was only 24 ears, but it sure seemed like a 100. I was going to can it in pints, but I just wanted to get it over with, so just bagged it up in a zip lock baggy for freezing.
These measly 8 bags better taste like CHOCOLATE after all this.
Labels:
freezing,
Preserving
Tuesday, August 07, 2012
Canning Praline Syrup
Well I decided to do something a little special for my hard-working husband today. When i got home from grocery shopping, I made some Praline syrup. I canned 3 half pint jars of it to be exact. I have never made anything like this before, but when I stumbled upon it on the web, I knew he would love it. he loves pecan pie and butter pecan ice cream. So I figured this was right up his alley. If he gives it the thumbs up, then I will make him some more. I have a bucket of vanilla ice cream waiting for him in the freezer.
Just look at all those delicious meaty pecans at the top.
The recipe for the Praline Syrup can be found HERE.
Preserving Cucumbers in the Freezer
I absolutely love cucumbers. Especially this year. i have been craving them all summer. Eating them dipped in ranch dressing, or dipped in italian dressing. eating them for late breakfast, lunch, or evening snack. Whenever the mood hits for something cool, crunchy and refreshing. no, i am NOT pregnant. Definitely NOT!
Several times this summer my local grocery store has been ut of them. sometimes for two weeks. Must be a lot of other cucumber lovers out there too. I have a bunch planted in the garden, but I am just now starting to get some to eat. I have been wracking my brain trying to figure out if there was anyway I could preserve them for fresh eating this winter without having to buy them. I like pickles and sometimes eat them for snacks, but thats not what I have been craving. Then one day i happened onto a recipe for freezing these guys in a solution of vinegar, water, sugar and salt. Supposedly they still come out of the freezer crunchy. I had my doubt however. So I asked my daughter-in-laws mother, who is an excellent cook, if she had ever heard of doing them this way. She said she had and that they were indeed still crunchy when defrosted.
A few days ago, I had a couple ready to eat from the garden, plus supplemented with a store bought. I needed to fill a 16 z plastic container. Everything went together very quickly. I put them straight in the freezer. Then 24 hrs later, I decided to pull them out and give them a try. Once defrosted, they were absolutely delightful. Slightly sweet, crunchy, cool and refreshing. I didnt stop till I had them half gone. Anyway, When hubby cam home I had him try them. I knew it would take a little coaxing. he is like a child sometimes when it comes to trying new things. but we wont discuss that any further.
I remembered his mother used to make them fresh and serve them in mix of 50/50 vinegar and water. he loved them that way. so i figured that was close enough to mom's.
Low and behold....he liked them. He really liked them
I dont know where I got the recipe from online, so I am sorry for not being able t give credit. But here it is:
FROZEN CUCUMBER PICKLES
1 lb. Kirby or pickling cucumbers, sliced (4 c.)
2 c. thinly sliced onions
1 tsp. salt
1/2 c. cider vinegar
3 tsp. water
1 c. sugar
Combine cucumbers, onions, salt and water in glass bowl. Let stand at room
temperature 2 hours. Add sugar and vinegar, stirring until sugar is dissolved.
Pack mixture lightly into 2 - 1pint freezer containers or jars, leaving 1 inch
space at top. Cover tightly and freeze overnight or up to 6 weeks. Thaw at room
temperature 4 hours. Refrigerate any leftovers up to 1 week. Makes 4 cups.
NOTE: Very good!!! The pickles stay crisp after thawing, even left over in
the refrigerator.
Saturday, August 04, 2012
Indecent Exposure!
Those ladies are at it again. In my front yard, naked as a jaybird, as us country folk say. They left their clothes lay on the ground in early spring, and disappeared. Now they are back, for the whole world to see. I have to admit, they are gorgeous. Even with their beautiful ink-stained faces. They always make me smile.
I had forgotten about mine again, until I was out in the front yard checking on my new apple tree, and turned around, and there they were. I love them. They were given to me by my husbands aunt. She dug them from an old farmhouse. I just have the one small clump but it keeps getting fuller every year. The flowers get about 20" tall, and come back every year reliably in my zone 6b garden. They are also called Magic Lily, and Resurrection Lily. I like Naked Ladies, lol. So much funner.
Lycoris Squamigera
Naked Ladies
And here are their clothes that they just casually threw to the ground this spring:
Labels:
Lillies
Another First
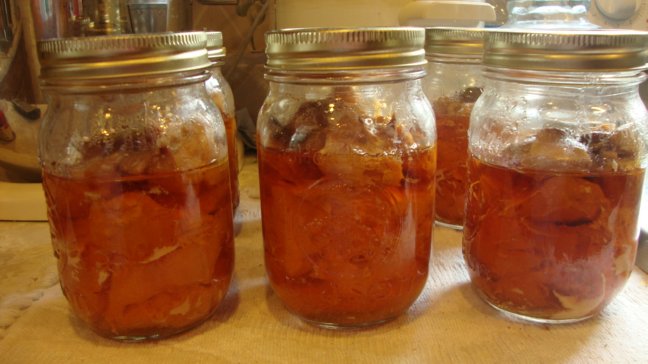
Last night I tried canning chicken for the first time. I had canned deer stew many many yrs ago. About 34 to be more precise. The first yr we were married. I hadn't done meat since. Well last night I was reading on several different blogs about canning cooked chicken by hot pack and raw chicken by raw pack. I also found a link for the USDA guidelines HERE. Doing raw pack seemed so much quicker and it was late in the evening when I got back with about 8 lbs split chicken breasts that I bought for .99/lb. I figured wrong and thought it would do more jars than it did. I only got 6 small pints. But its cooked and ready to go for chicken salad sandwiches, or creamed chicken on biscuits. I usually buy the cans in the store for almost $3 / can. I figure one pint is easily equal to 2 cans of meat. The chicken made its own broth but next time I will add about 1/2 jar of water to help it out more. Here is how I did it:
1. cut up your chicken into chunks. I have also read about putting whole peices in.
2. Sterilize jars and lids, keeping lids warm.
3. Fill your jars with the raw chicken.
4. I placed a tsp of chicken bouillon on top. Some do this some dont, some just add a tsp of salt.
5. For test purposes, and because we like garlic, I also placed about 1/8 tsp of garlic salt on top.
6. Pour about 1/2 jar of sterilized water into jar. ( I didnt this time, but will the next)
7. Clean rims thoroughly. Some clean with a little bit of white vinegar, then dry.
8. Apply lids and hand tighten rings.
9. Place in canner with water, and process according to your towns elevation. Mine was 10 lbs for 75 minutes for pints.

Correction: I was informed by an experienced canner that any time you
pressure can or BWB for 10 minutes or more there is no need to
"sterilize" the jars. There is possibly the need to warm the jars to
prevent thermal shock and breakage but no need to "sterilize".
1. cut up your chicken into chunks. I have also read about putting whole peices in.
2. Sterilize jars and lids, keeping lids warm.
3. Fill your jars with the raw chicken.
4. I placed a tsp of chicken bouillon on top. Some do this some dont, some just add a tsp of salt.
5. For test purposes, and because we like garlic, I also placed about 1/8 tsp of garlic salt on top.
6. Pour about 1/2 jar of sterilized water into jar. ( I didnt this time, but will the next)
7. Clean rims thoroughly. Some clean with a little bit of white vinegar, then dry.
8. Apply lids and hand tighten rings.
9. Place in canner with water, and process according to your towns elevation. Mine was 10 lbs for 75 minutes for pints.
Correction: I was informed by an experienced canner that any time you
pressure can or BWB for 10 minutes or more there is no need to
"sterilize" the jars. There is possibly the need to warm the jars to
prevent thermal shock and breakage but no need to "sterilize".
This tip came from someone on yahoo groups " canning2".
UPDATE: I just opened a pint of this chicken because my husband wanted chicken salad sandwiches for lunch. This chicken turned out fabulous! So moist, and flaked like a dream. Tasted soo much better than the store canned. I also figured up the price. Not counting electricity or costs of the jars since they are re-usable. I bought about 8 lbs. It should do about 5 pints "packed". This equals out to about 3 cans of the store chicken after it shrinks from cooking. So it equals about $1.60 per pint, or about .53 cents per can. So much cheaper than the almost $3 per can I pay in the store. But more importantly, much better quality and taste. Also figured out the slightly darkened areas on the top are just from the chicken bullion. Next time I probably wont use it, or at least mix it with the water first.
Labels:
canning
Tuesday, July 31, 2012
Fabulous, Moist Banana bread
I have a recipe for banana bread that i have used for years. It makes a wonderfully dense,moist loaf. I recently tried another I found online and the whole family was very disappointed. It was lighter, more bread or cake like. Not my usual rich loaf. Then yesterday i found THIS recipe by Patricia at ButterYum blog. It looked very good. More like my loaves. I liked her idea of a crumbly topping. I have used this similar recipe for my french apple pie, but never thought of it for the banana bread. She also adds sour cream. My recipe called for milk. So I adapted my recipe to include those ingredients. It turned out fabulous. My original loaf was very good, but Patricia's additions made it so much more delightful. here is my new, one and only banana bread recipe.
Banana Bread
1/2 cup milk
6 very ripe bananas
5 cups flour
1 cup granulated white sugar
1 cup packed brown sugar
7 tsp baking powder
2 tsp salt
10 tbs butter
2 eggs
2 and 1/2 tsp ground cinnamon
1 tsp ground clove
1/2 tsp ground allspice
2 tsp vanilla extract
1/3 cup sour cream
1 cup raisins
1 cup chopped walnuts or almonds
Topping:
Courtesy of butterYum
6 tb melted butter
2 tsp cinnamon
1 cup flour
1 cup brown sugar
pinch of salt
Combine all ingredients except nuts and raisins, for bread with a blender. then fold in nuts and raisins. Spray bottom of pans.Fill your loaf pans about 3/4 full. Mix crumbly topping, and sprinkle on top of batter. Bake loafs at 350 degrees for 65-70 minutes or till a knife inserted in center comes out clean. With this recipe and the size of my pans, I got 2 nice size loaves and 2 mini loaves.
I enjoyed mine warm smeared with a little country crock margarine.

Banana Bread
1/2 cup milk
6 very ripe bananas
5 cups flour
1 cup granulated white sugar
1 cup packed brown sugar
7 tsp baking powder
2 tsp salt
10 tbs butter
2 eggs
2 and 1/2 tsp ground cinnamon
1 tsp ground clove
1/2 tsp ground allspice
2 tsp vanilla extract
1/3 cup sour cream
1 cup raisins
1 cup chopped walnuts or almonds
Topping:
Courtesy of butterYum
6 tb melted butter
2 tsp cinnamon
1 cup flour
1 cup brown sugar
pinch of salt
Combine all ingredients except nuts and raisins, for bread with a blender. then fold in nuts and raisins. Spray bottom of pans.Fill your loaf pans about 3/4 full. Mix crumbly topping, and sprinkle on top of batter. Bake loafs at 350 degrees for 65-70 minutes or till a knife inserted in center comes out clean. With this recipe and the size of my pans, I got 2 nice size loaves and 2 mini loaves.
I enjoyed mine warm smeared with a little country crock margarine.
Homemade Blackberry Jam
I just made my first Blackberry jam. I started it yesterday and just finished it this morning. My son brought me in a small amount of berries, longing for jelly made from these precious jewels. So how could i resist. I believe the recipe came from the book " Blue Ribbon Preserves". I checked it out of the library and took some extensive notes on things I wanted to try. I only had enough berries to make 2 half pint jelly jars, so had to convert the recipe. So I whipped up 2 jars of Simple Grape Jelly from some Grape juice I had. I hated to run the water bath for just 2 jars,lol.
Blackberry Jelly
To make blackberry juice:
3 quarts berries
1/2 cup water
jelly ingredients:
5 cups juice
7 and 1/2 cups sugar
2 (3 oz) pouches liquid pectin
To extract juice, gently rinse berries in cool water in colander and drain. Put berries in 8 qt pot, Combine berries and water over medium low heat. bring to 180 degrees, and heat 5 minutes. DO NOT BOIL!
recipe called for placing berries in a fine meshed sieve. i didnt have one, so i lined my colander with coffee filters and placed this over a bowl. I then poured the berries into this and covered the top with some saran wrap and placed in the fridge to strain over night. You are supposed to do this slow gentle drain, rather than squeezing them. it stated forcing the juice thro would make a cloudy jelly.
The next day discard the pulp and seeds left in the sieve or colander.This amount of berries is supposed to make approx 5 cups of juice.To make jelly, Place berry juice into 8 qt pot and heat till warm. Add sugar and heat. Stir continuously till sugar dissolved. Increase to medium high heat and bring to a full rolling boil.. Stir in pectin. Return to a full rolling boil. Stir constantly for 1 minute. remove from heat, Quickly skim foam, and ladle into sterilized jars. Clean rims, and apply hot lids and rings. Hand tighten. Process in boiling water bath with water covering tops of jars for 10 min. I used 15 for my altitude.
Blackberry Jelly
To make blackberry juice:
3 quarts berries
1/2 cup water
jelly ingredients:
5 cups juice
7 and 1/2 cups sugar
2 (3 oz) pouches liquid pectin
To extract juice, gently rinse berries in cool water in colander and drain. Put berries in 8 qt pot, Combine berries and water over medium low heat. bring to 180 degrees, and heat 5 minutes. DO NOT BOIL!
recipe called for placing berries in a fine meshed sieve. i didnt have one, so i lined my colander with coffee filters and placed this over a bowl. I then poured the berries into this and covered the top with some saran wrap and placed in the fridge to strain over night. You are supposed to do this slow gentle drain, rather than squeezing them. it stated forcing the juice thro would make a cloudy jelly.
The next day discard the pulp and seeds left in the sieve or colander.This amount of berries is supposed to make approx 5 cups of juice.To make jelly, Place berry juice into 8 qt pot and heat till warm. Add sugar and heat. Stir continuously till sugar dissolved. Increase to medium high heat and bring to a full rolling boil.. Stir in pectin. Return to a full rolling boil. Stir constantly for 1 minute. remove from heat, Quickly skim foam, and ladle into sterilized jars. Clean rims, and apply hot lids and rings. Hand tighten. Process in boiling water bath with water covering tops of jars for 10 min. I used 15 for my altitude.
Monday, July 30, 2012
Almond Peach Jam...Sunshine on a Spoon
I made peach jam for the first time today. I still had some left over South Carolina peaches still left that no one had eaten yet. I added some almond extract, and this stuff tastes fabulous! Even my 23 yr old daughter, who said she didn't like peach jam, liked it... really well!
So I peeled, pitted and mashed them. I came up with about 3.5 cups, which was about 1/2 a cup short for my 4 cup recipe. So I added a 1/2 cup of orange juice. The jam set up beautifully, and so crystal clear and gorgeous. There are a few dark reddish/black flecks here and there. Don't start gagging. They aren't bugs,lol. ( I notice the dark flecks aren't visible in this jar.) It's just that I had cooked some blackberries for jelly just before this, and didn't bother to rinse my masher off completely. The addition of the almond extract, it a wonderful compliment.
Almond-Peach Jam
4 cups peeled, pitted, and crushed yellow peaches ( I added 1/2 OJ to 3.5 c fruit)
1/4 cup strained fresh lemon juice
7 and 1/2 cups sugar
1/2 tsp butter
1 (3 oz) pouch liquid pectin
1 tsp Almond extract
Cut fruits, in half, remove the pit, and the tough reddish area that surrounds the pit. Drop these into an 8 qt pan with the lemon juice to prevent darkening. Crush these with a potato masher.
Stir in half of the sugar. Cover pan, and let sit 20 minutes. In the mean time, place your jelly jars in a pot of water to sterilize.
Remove cover and stir in remaining sugar. and butter. Over medium-low heat, stir till sugar is dissolved. Then increase heat to medium-high, and bring to a full rolling boil. Remove pan from heat and skim away any foam.
Return pan to heat and bring back to a full rolling boil. Stir in pectin, and reheat to full rolling boil. Stirring constantly so it doesn't burn. Boil one minute. Remove from heat and skim foam again. Add 1 tsp of almond extract.
Cool 5 minutes, stirring every minute. Remove your jars from the pot and set out on a towel. Place your lids into the boiling water and leave till ready. Fill your jars using a funnel. Clean the rims of your jars and place hot lids on. Hand tighten rings on jars, and place jars in your boiling water bath, with water cover the tops. Process for 10 minutes (depending on your altitude) at 200 degrees. Remove jars and set on towel undisturbed for 24 hours. Then remove rings, label, and store. This makes 8 half pint jelly jars. I think I had about 1/8 cup left over that I placed in a container in the fridge.
The basis for this recipe, I believe came from the book, "Blue Ribbon Preserves" which I checked out from the library.
This stuff is fantastic. I love it on toast, but I have also used store bought peach jam in my sweet and sour chicken. Now I can use my own.
So I peeled, pitted and mashed them. I came up with about 3.5 cups, which was about 1/2 a cup short for my 4 cup recipe. So I added a 1/2 cup of orange juice. The jam set up beautifully, and so crystal clear and gorgeous. There are a few dark reddish/black flecks here and there. Don't start gagging. They aren't bugs,lol. ( I notice the dark flecks aren't visible in this jar.) It's just that I had cooked some blackberries for jelly just before this, and didn't bother to rinse my masher off completely. The addition of the almond extract, it a wonderful compliment.
Almond-Peach Jam
4 cups peeled, pitted, and crushed yellow peaches ( I added 1/2 OJ to 3.5 c fruit)
1/4 cup strained fresh lemon juice
7 and 1/2 cups sugar
1/2 tsp butter
1 (3 oz) pouch liquid pectin
1 tsp Almond extract
Cut fruits, in half, remove the pit, and the tough reddish area that surrounds the pit. Drop these into an 8 qt pan with the lemon juice to prevent darkening. Crush these with a potato masher.
Stir in half of the sugar. Cover pan, and let sit 20 minutes. In the mean time, place your jelly jars in a pot of water to sterilize.
Return pan to heat and bring back to a full rolling boil. Stir in pectin, and reheat to full rolling boil. Stirring constantly so it doesn't burn. Boil one minute. Remove from heat and skim foam again. Add 1 tsp of almond extract.
Cool 5 minutes, stirring every minute. Remove your jars from the pot and set out on a towel. Place your lids into the boiling water and leave till ready. Fill your jars using a funnel. Clean the rims of your jars and place hot lids on. Hand tighten rings on jars, and place jars in your boiling water bath, with water cover the tops. Process for 10 minutes (depending on your altitude) at 200 degrees. Remove jars and set on towel undisturbed for 24 hours. Then remove rings, label, and store. This makes 8 half pint jelly jars. I think I had about 1/8 cup left over that I placed in a container in the fridge.
The basis for this recipe, I believe came from the book, "Blue Ribbon Preserves" which I checked out from the library.
This stuff is fantastic. I love it on toast, but I have also used store bought peach jam in my sweet and sour chicken. Now I can use my own.
Subscribe to:
Posts (Atom)