"Life is not measured by the number of breaths you take but by the moments that take your breath away?"

Author: Unknown

Friday, April 30, 2010

Dealing With Fibromyalgia

  I usually don't get into details of how I am dealing with the fibromyalgia, but I had to share what happened this morning. I have had this since 1995. Which at that time, there was very little information about it. I had been a nurse for 14 yrs by then and had never heard of it. Now its all over the TV, when they try to push drugs for everything, then you have to buy more drugs to treat the side effects.When one has a lifetime condition it helps to not take everything so seriously (when you can). Fibromyalgia, in case your not aware of it , causes widespread pain, fatigue,tender points,sleep disturbance,  problems with your thought processes, and a host of other symptoms that can come and go as they please.. I think the" thinking" problems are actually caused by the lack of deep restorative sleep. Which, early on, even caused me to start reversing letters and numbers. Thanks goodness for spell check. Now the pain isn't always bad, but its usually always present to some degree. This winter has been the worst for me for some time. Cold usually seems to trigger more muscle pain and fatigue which leads to other things. Once the weather started warming, I started feeling better, and getting some energy back.There are days I don't make it off the couch until I have to, and others I get a brief reprieve to enjoy life.You never know how your going to feel from one minute to the next.As for the "thinking" problem, that is another thing that can sneak up on you and  grab you by surprise. Its the one thing about this condition that I can laugh about, and believe me sometimes it gets hilarious. Except when I get lost, but thats a whole other story.
   Anyway, you have a little bit of background. Here is how my morning went: We woke up about 6Am. We were lying in bed, snuggled up under a warm blanket, and had started talking.

Me: It had seemed later than it was, and I was trying to figure out in my head why my husband wasnt up yet to get ready for work. " Are you off today?"

Him: "No"

Me: "Are you off Monday then?"

Him: "No, why?"

Me: "Cause this weekend is the fourth?"

Him: Already realizing I am not thinking clearly again, he said with a chuckle, " This is only May".

I was thinking this weekend was the fourth of July instead of the fourth of May, lol. Oh well, another interesting day is about to begin.


Thursday, April 29, 2010

Planting Out Winter Sown Seedlings

  This is my first year winter sowing, and I know it wont be my last. This has to be the easiest and most productive way to mass sow seeds. I sowed out over 226 containers. I still have a few that haven't (and may not) germinated yet. But I cant complain, because I have so many that have. Some are even almost 6" high. I did find out that it is best to have the soil moist before trying to pop them out of the milk jugs. If the soil was a little dry, and I tried to pull out clumps of seedlings, or turn the jug over to get them out, they would fall apart. But if the soil was moist then I could take them out as one big cake, and separate the clumps into the size hunks I needed. Or as winter sowers call HOS, hunk of seedlings. Instead of planting out individual seedlings, it is much easier and quicker to plant them out in hunks. And from pics I have seen on Gardenweb, it looks much nicer and fuller when the plants have matured. Here is a clump after I turned over the milk jug and slid it out:
Now all I do is divide this large clump up into a few smaller ones. The size of the hunks are determined by how heavily I sowed, and the type of plant. A few things, I realized too late that I sowed way to heavily. Such as the Butterfly bush...es. These seedlings are packed into one jug. There is now way I am going to need 100's of Butterfly Bushes, no matter how well I like them. But I am learning,lol.

Random Pics In My Garden


                                                                     Gerber Daisy

                                                                       Purple Iris

                                                                 Curly Leaf Hosta
Pink Clematis


Heuchera and Hosta combinations that I really love. I love the combination of the bright greens with the burgundy foliage.


Purple Columbine


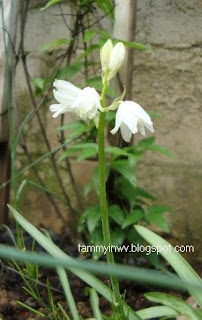
White Scilla


Lavender Scilla


Heuchera Southern Comfort


Wild flowers growing in the yard


Red Twig Dogwood before the leaves


Red twig Dogwood with the leaves


Pieris japonica "Mountain Fire". I love the new red leaves.


My very first sprouts in our brand new potager.
I direct sowed Alyssum around the peas. The peas arent showing yet, but you can barely see the Alyssum showing its leaves.


The lettuce is thru just about as much as the Alyssum.
Here is a shot of the front of my house taken about 1/2 way down the front yard.There is a small pond just to the left. It is desperately needing some work.


Here is a pic of the back of my house, actually where my living room is located. if you look closely to the right you can see part of the jugs etc from my winter sowing.In the foreground you can see the top of the retaining wall.


I love how this Lamium almost glows in my shade bed.


I cant wait for the weather to stay warm and things really start blooming. Right now things look a little bare.

Wednesday, April 28, 2010

Hopefully Our Last Frost

   Well the weather forecasters first said we were to drop to 31 ° last night, then just before going to bed it said 29°. During the night I read it was 32°. I woke up this morning to a pretty good frost everywhere but my backyard. If there is any there it is so light I cant see it. My backyard kind of has its own little microclimate going. The house backs it up to a hill, and there is another large hill on the right, and a small knoll on the left. Trees surround all sides but the house. So far everything looks OK ,even my winter sown seedlings, perennials AND annuals. I had brought my tomatoes in that werent winter sown, the others stayed outside. May 15 is our official last frost date. I think if weather permits, I will go ahead and plant out my tomatoes this weekend.

Update 4/29/10--Well it wasnt the last! We had another last night. This time I was caught off guard, and had left all my tomatoes, fuschia, and more outside. Fortunately, that backyard microclimate thing must have saved them. Nothing was harmed. Other than a cup of Balsam I had sitting out. I guess it doesnt like the cold too well.

Monday, April 26, 2010

Pieris Japonica "Mountain Fire"

    I have two of these fairly slow growing shrubs in the back of my tiered bed. This is such a large bed (60 ft long x 6 ft deep). I like to have "anchors" interspersed in the bed. Something that has some height, and can even provide some winter interest. These are evergreen, and only get to 6 ft in height. So far they are staying pretty slim as well. So they are working out ideally. This variety gets its name from the new growth that appears in spring. It is a bright "fiery" red. As the new growth ages it turns to kind of a mahogany, then a bright green.The flowers that appear in spring, hang in chain  like clusters of little white ,cup shaped flowers.It supposedly prefers acidic soil, but my soil tends to be more neutral towards alkaline, and they have done very well. it gets full sun, and has never needed any kind of winter protection. It is hardy from zones 4b to zone 7b. I am in zone 6 to 6b. Take a look at how brilliant this red is.


This pic shows the beautiful white blooms. Actually this shot doesnt show the true white that they normally are as this shot was taken as the flowers had started fading somewhat.


Sunday, April 25, 2010

All On A Spring Day

   Spring weather has hit, and I have been working outside all weekend. We had lots of rain in the forcast, but so far all we got was during the night. Today was a beautiful sunny day, with a light breeze. Perfect for hard labor. Yesterday, my husband and I built the arbor over the entrance. Today I stained the whole thing (fence and arbor). Well actually my 21 yo daughter  stained the arbor, and helped me with the fence. She is a little taller than I am. My 4 yo grand daughter helped me with the fence using a small paint brush. You know how it is working with a 4 yo and paint. Actually she did pretty good, she didnt have any paint on her except where I got it on her. Now my daughter and I were a different story,lol. I bought 1 gallon of Cabot solid stain in Cordova Brown. It is a real  rich, dark chocolate color. I will get more pics posted  in a bit. The potager is looking fantastic.
   I placed several Heavenly Blue Morning Glory seeds inside a damp paper towel and placed in a baggy on top of my fridge. in 2 days these all germinated, huge plump roots on them. So I went ahead and tilled a 2.5 foot deep bed along the length of the front of the potager for flowers.I also hauled many buckets of manure to fill about 2-3" on top of the tilled dirt. I am going to plant the morning glories to grow over the arbor. I love the blue of these. I have seen many lovely pics of this MG on arbors. And now will be my first time growing this one. I also bought seeds for a low growing sunflower called Peach Passion. Unfortunately they dont produce seed, so I wont be able to save them for next yr. I am planning on putting these out in the bed in the front of the potager.
    I also bought a May Night Salvia from Home Depot on Thursday. I had never seen this plant in person before that day. I love the dark bluish flower spikes. It was placed right in front of my birdhouse.My daughter also spent several hours weeding my long terraced bed, and hauling more horse manure in to top dress it. I love the dark,rich brown color against the plants.We have about 2/3 of the bed weeded. I am trying to amend soil and plant some of the seedlings out as I go. That huge trailer of manure is now down by half.
                                                                 My Gardening Team
They were caught sitting on the upper tier of the retaining wall, taking a short break together. As I got ready to snap the picture my daughter was in view, then suddenly moved behind the shrub, almost as if she sensed I had the camera ready.  As memorable, magical  moments do, they flit past in a second,a brief glimpse then gone. 


Here is a quick pic of the freshly stained fence of the potager. The dark areas in the front are the newly tilled flower beds with a thick layer of aged horse manure on top. Better than pine mulch!


Salvia May Night, however this one is small and not much to look at ....yet.


Wednesday, April 21, 2010

AAAHH, The Sweet Smell Of.......Manure?

     I had just about finished up using the last 3 dozer scoops (one full truckload) of  well aged horse manure my son brought in for me from my neighbors over the last couple of weeks. All those beds I had and have been putting in, got a healthy dose. So my son went last night and got me a trailer load. Four dozer scoops ! My son said he figured it was pretty close 2 ton of manure. The trailer is now waiting in the back yard for me to empty. I want to put this in my 60 ft terraced bed out back. that soil is hard, dry, compacted clay in most spots. I dont know how anything grows in it. I am adding  it in to newly dug holes while planting out my winter sown seedlings, and I would like to get at least a couple of inches added to the whole bed around all the plants.


Tuesday, April 20, 2010

Planting out the Potager

   Along with the weeding, and bed building, I have also been working on the potager. In one bed I  planted out 30 strawberries, and edged the bed with lettuce, and added mulch. In another bed I planted peas, and filled with a purple Alyssum. I also made a pea trellis out of some wire garden edging that I pulled out from some where else. the only thing is it was just a foot high. My peas are expected to grow 24"-36" high. So I stacked 3 rows, one on top of the other. overlapping slightly and bending the ends over to attach each row to the one below. Then this is stuck into the bed in a zigzag fashion. Similar to the pea fence found on Burpee HERE.
                                                        Pic courtesy of Burpee.
Here is my version, a little more ornamental:

This shows how it is placed in a zigzag. it also folds up accordian style for storage:

Can't wait to see how it looks with the peas vining up it.

   Here is a pic showing where everything is planted so far. Everything that can be planted out before last frost. You can click on any pic for an enlarged version. My husband still has to plow up 2 more of the 4x8 beds, and the rest of the perimeter beds. I cant wait to get the tomatoes in, but they have to wait till closer to April 15, our last frost date. Here is a list of what was planted:
Mr. big Peas
Onion, evergreen bunching
Carrot, Mezza Lunga Nantese_ The Italian Choice
Lettuce, Simpson Elite
Lettuce, Master Chef Improved blend
Alyssum, Royal Carpet
Peppers, California Wonder 300 TMR
  I still gotta get this guy stained and till outside the fence, for planting sunflowers etc.I also plan Heavenly Blue Morning Glories at the gate, and maybe some Japanese Morning Glories growing around the fence, or inside on small towers.

Weeding and Building New Beds

I have spent the last couple of weeks doing some major gardening work, and my hands prove it. My 21 yr old daughter was home and helped me weed our 60ft x 8 ft deep raised bed behind a stone retaining wall. She is a perfectionist at this. She didnt stop until she had the section she was working on down to bare dirt, without a sprig of weed left. We still have about 12 feet left to do.
I also have re-done old beds, making them bigger, edging them, and heavily amending with aged horse manure. Then I moved a few plants, and added several more hunks of my winter sown seedlings. I edged the beds with a shovel. takes some time, but not too difficult. These beds had only been crudely and quickly put in before. Actually not even beds, just some things thrown in.


Monday, April 19, 2010

Milorganite For Deer Control

   When I first heard about this in the forums, I figured it was probably just another thing too good to be true like Irish Spring Soap, dog hair etc. To be honest I was a little put off about what it was made of as well. Then a friend said she had been to a local nursery that used it and swore by it.She said they simply hung up bags made of hose with Milorganite in it around the perimeter of their nursery.Finally, I decided to give it a try. 
    
The website says it is a "dependable, slow-release, non burning organic fertilizer". It also states "research done at Barry College and other sources says Milorganite has an efficacy of being a deer deterrent". Now for the "not-so-good" part. It is made from processed Milwaukee sewage. If you are like me, your probably screwing up your face pretty good right about now. It took me awhile to get past that. You can find out more HERE..
   Here is what it looks like to the right. As you can see, nothing like its former self, thank goodness.There is a slight odd odor about it, nothing strong. Once its in your garden or hanging up, I notice no odor at all. Its easy to forget its there. According to the site, its safe around your family, and even safe to use it on your veggy garden. However, thats where I personally draw the line. Aged horse manure was bad enough.
    I have to tell you though, it works! I dont know about the fertilizer part, since in the beginning I hung up pouches around the perimeter of my backyard, but it does keep the deer away. It couldnt be easier. Late last fall, I hung up satchels of this stuff just around the perimeter of my backyard. Remember, I was just beginning my testing of it. I watched during the winter. I saw a deer in this area once all winter. When warm weather started, I found the deer had rubbed my small, 6 ft  willowtree almost in half. Shrubs around my side yard had been eaten down to the branches, and there was deer droppings all around my front walk. Then when tulips season started, I noticed I actually had buds! I havent had buds on my tulips for at least 5 yrs or more. I have some I have never seen bloom or even bud since they were planted. I thought at first that I had just gotten to the early enough to apply cayenne. Never thought about the Milorganite. Then I noticed that I had other tulips blooming in other areas that I hadnt put the cayenne on. Now dont get me wrong, that deer concoction I mixed up last yr did the trick, but it needed to be reapplied every couple of months or they came back. I also noticed that not one of my hosta's had been touched, and they hadnt had anything on them as well. Same for the Heuchera, which the deer loved last yr. So I got out my bag and sprinkled it directly around my beds lightly. I am also building a potager.I said how I felt about this stuff in the food garden ( but thats just my quirks). So I just sprinkled it lightly around the outside perimeter of the garden. I had not re-applied or re-filled bags all winter even into early spring. That was at least 7 months of deer relief. I just re-applied to be on the safe side. I have beautiful tulips, heuchera, hosta's and more to enjoy. It couldnt be easier. Here is a link to the Milorganite website for lots of info.


Saturday, April 17, 2010

Clay Pot Birdbath

I found this wonderful terra cotta tray at BigLots the other day. They have a wonderful shiny, mottled blue finish. They are the type of trays that you set under your clay pots. It is 14" wide, and was only marked $9.99. The plain unfinished ones are around $20 in other stores. I have been wanting a birdbath for some time, but I really didnt want to pay out the $25 and up that they cost for little ones. I have seen pics on GW and other places online where others have used clay pots, and they trays to make one. They were usually stacked like you would see them on the shelf but of different sizes. I wanted a taller one with a little bit of shape tho. So I bought  a pain unfinished 10" pot, and a 8" pot. I also bought one of the little 6" trays. I turned the 10" pot upside down, then glued on the 6"tray upside down onto the bottom of that. Then I turned the 8" pot right side up and glued it to the bottom of the tray. WaLa! a birdbath base.
I had to take this pic inside since it was raining outside. So its a little dark. I wanted to take one of everything before assembled, but in my excitement I forgot :)


Now , as I said the blue 14" enameled pot tray already had a wonderful heavy, shiny (glazed) finish on it, so I had to attempt to paint the base to match. It wasn't easy, but I kept working at it until I was satisfied it was close. I used regular craft acrylic paints. I also used Gorilla Glue to Glue everything but the "bowl" together. I figured I would leave it loose for ease of storing and cleaning. Once everything was dry, I sealed with several coats of a gloss finish. An hour later it was ready to be assembled and placed in my flower bed.It stands about 2 ft tall. The flowers are just starting. I also have a lot of winter sown seedlings I started placing around it. Hence the plant markers. Once these has matured I can pull the markers  if they are noticeable in the foliage. What do you think? A close match?


PS: I just entered this into the DIY Club Inc. July Contest